How to Purl Stitch for Beginners
The second stitch to learn as a beginner knitter!
The second stitch to learn as a beginner knitter!
Learning how to purl stitch is the second basic stitch in knitting! In fact, knit and purl stitches are the first skills you need to learn in order to make any of the other patterns. Once you know how to knit and purl, you’ll have all the skills you need to knit the ribbing stitch, seed stitch, stockinette stitch, and more!
In this step-by-step tutorial, we’re going to teach you how to purl for beginners! We have a handy video, photo tutorial, and written steps to get you started and help you practice purling beyond the first row. In the later sections, we also share some common ways to fix stitches that are too tight or loose before digging into the difference between knit and purls.
Since purling is a foundational technique, it doesn’t get much easier! The first step is getting the hang of wrapping the yarn around your needles. It’s important to pay close attention to how your yarn is wrapped to avoid twisting your stitches (more on that later in this tutorial!). Next, you’ll practice keeping your yarn tension consistent so that you’re making smooth, even stitches.
Every project starts with a cast on row. If you’re following a pattern, cast on the number of stitches noted in your project. If you’re simply knitting a swatch or test piece, go ahead and cast on enough stitches for a 4” fabric using the needles and yarn of your choice.
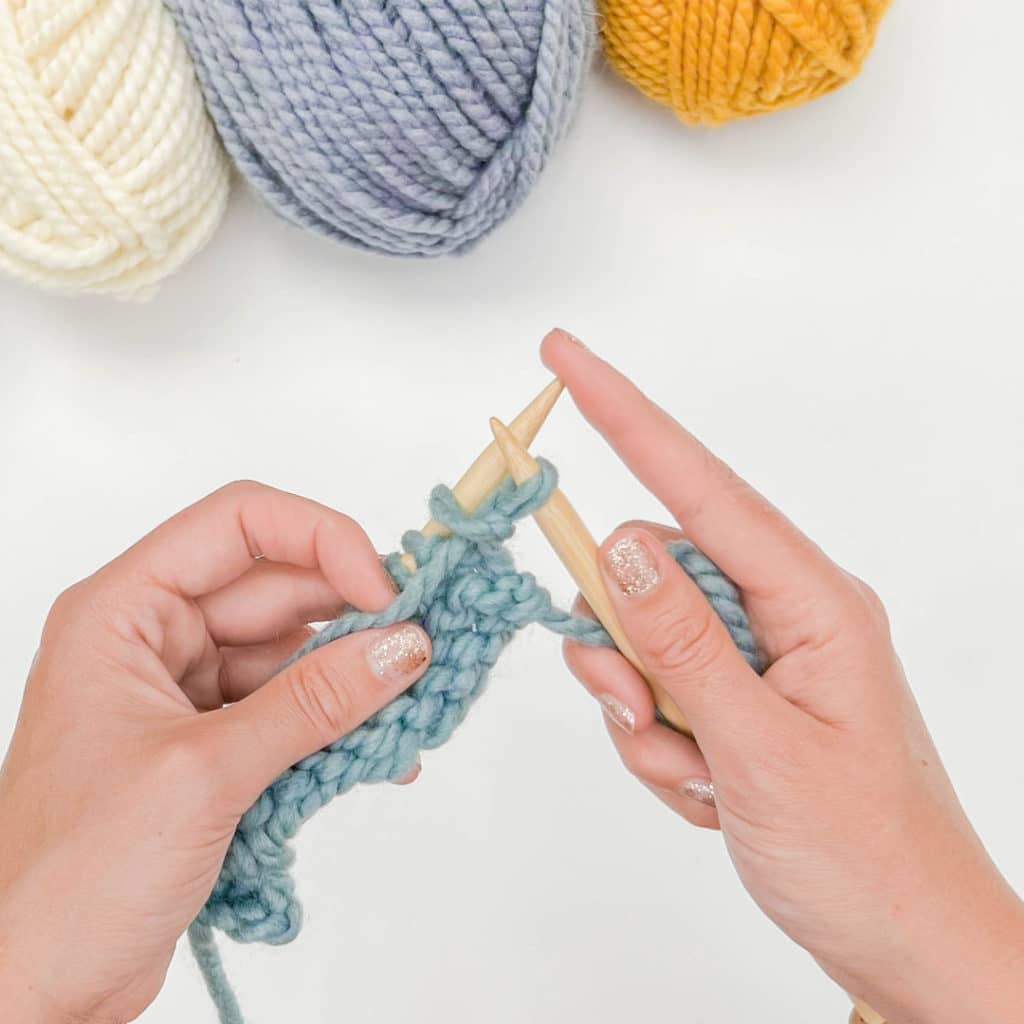
Note: This tutorial was written for right-handed knitters.
Since purling is a foundational technique, it doesn’t get much easier! The first step is getting the hang of wrapping the yarn around your needles. It’s important to pay close attention to how your yarn is wrapped to avoid twisting your stitches (more on that later in this tutorial!). Next, you’ll practice keeping your yarn tension consistent so that you’re making smooth, even stitches.
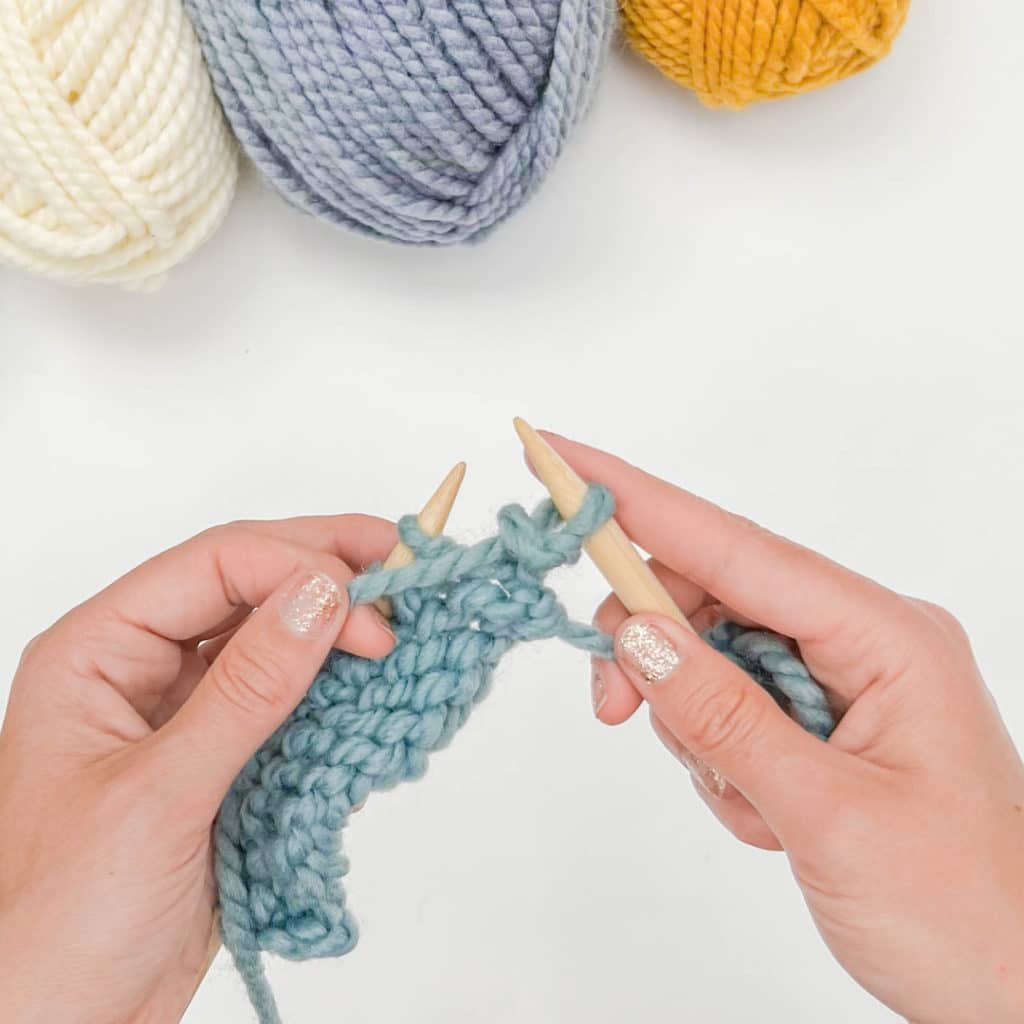
STEP 1
Insert the right-hand needle through the first stitch from right to left through the front loop, going in from the top of the stitch.
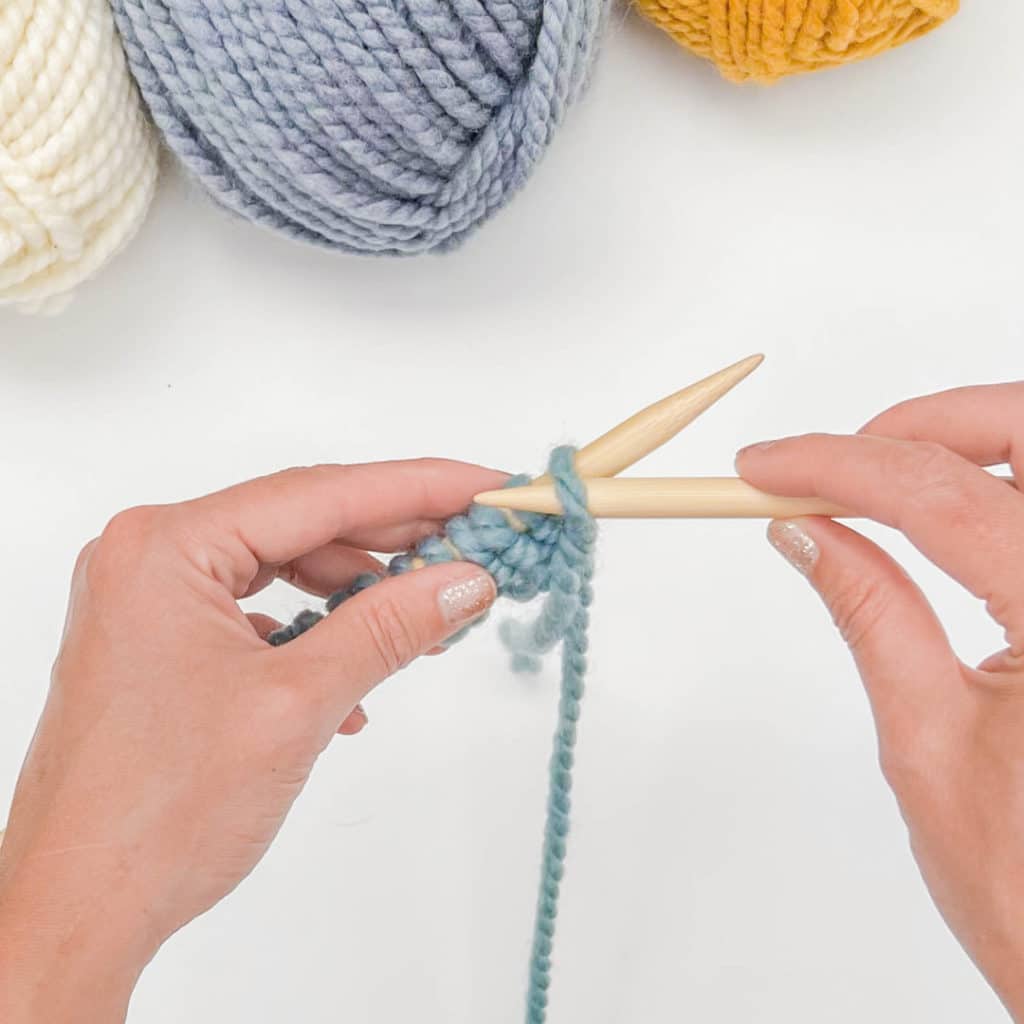
STEP 2
Wrap the working yarn up and over your working needle from front to back (counter-clockwise) and down between the two needles.
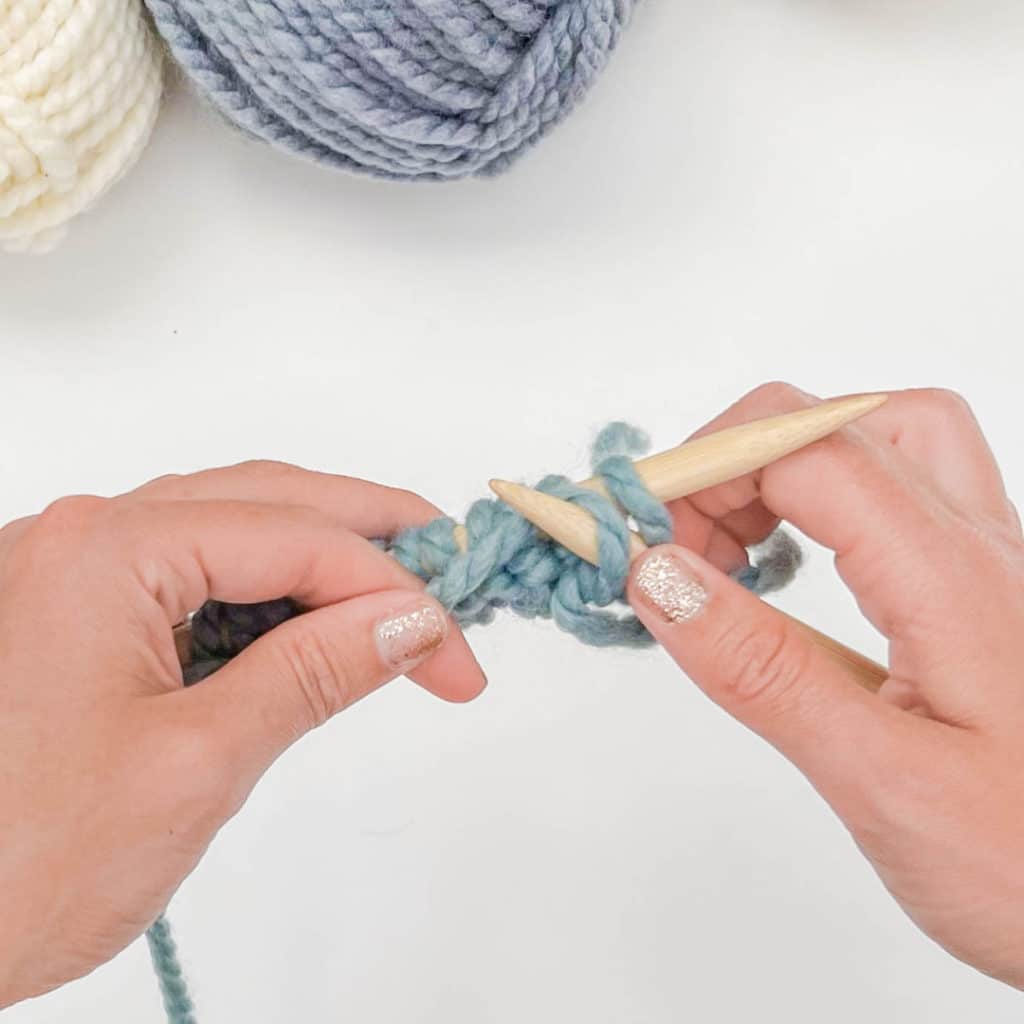
STEP 3
Pull the loop through the stitch by pivoting your right needle tip toward the left needle.
You can use your fingertips to pin the yarn between the two needles as you use the point of your right needle to pull that new loop through the stitch.
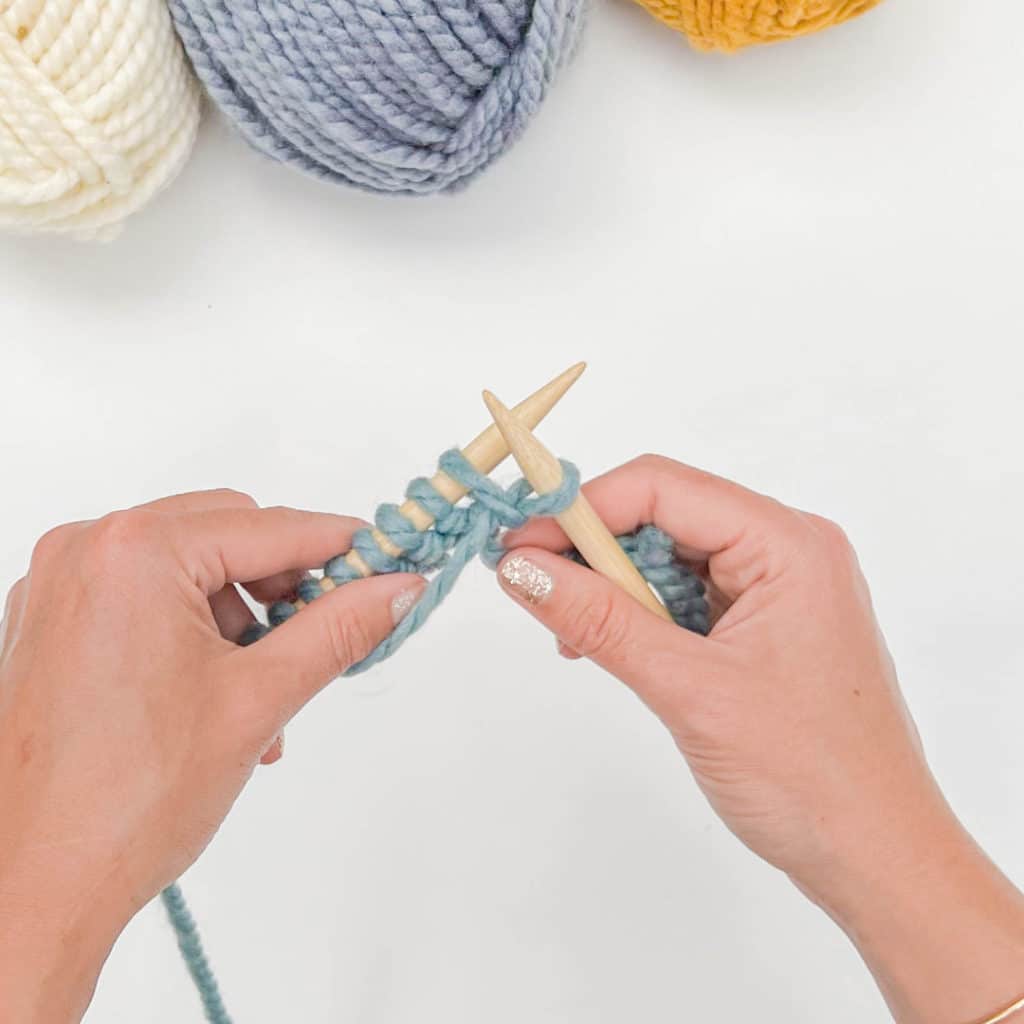
STEP 4
Slide the original stitch off your left-hand needle.
Tip: You can use your pointer finger to either pin the new stitch in place so that it doesn’t fall off in the process or to help pull the new stitch off the left-hand needle.
STEP 5
Time to repeat! You now have one stitch on the right needle, the yarn is in front of your piece and you’re ready to repeat Steps 1-4 until you’ve purled all of your stitches!
We’ve condensed the instructions above into a text-only set of instructions to make it easy to practice the purl stitch! Use the steps below for a quick refresher on each step. Note: This tutorial was written for right-handed knitters.
Step 1: Hold the needle with your cast on stitches in your left hand, and bring the yarn to the front of your work.
Step 2: Insert the right needle downward through the front leg of the stitch from right to left.
Step 3: Wrap the yarn up and over your working needle from front to back (counterclockwise) and down between the two needles.
Step 4: Pull the yarn through the stitch by pivoting your right needle tip toward the left needle, using the point of your right needle to pull the yarn strand through the stitch.
Step 5: Using your pointer finger to keep the new stitch in place on the right needle, slip the original stitch off of the left needle, letting it drop down.
Repeat steps 2-5 for each purl stitch.
There are a few common mistakes that people make when learning how to purl stitch. Practicing early and often will make it easier to form your stitches quickly and correctly later on when you’re trying more advanced stitch techniques. It’s worth learning the basic stitches right the first time!
When you wrap your yarn up and over your needle, make sure to leave it loose enough that the strand is touching the needle but not so tight that it’s stretched tightly against the needle. Once you slide the stitch off your left-hand needle, it’s easy to gently tug on your yarn strand to tighten the stitch against the needle but not as easy to loosen it if it’s too tight to begin with.
Once you’ve worked a purl stitch and slid/dropped it off of your left-hand needle, gently tug on your yarn strand to tighten the stitch against the needle. The stitch should rest against the needle with no extra space between the fibers and your knitting needle.
Make sure to wrap the yarn in the correct direction on the needle. You want the yarn to wrap “counterclockwise” up and over your needle. Wrapping the yarn the wrong way will create a twisted stitch. A twisted stitch creates a bumpy fabric with stitches that don’t lie flat. Make sure to learn the right way to wrap your yarn on your needles for the knit and purl stitches so that you don’t run into problems later on!
Being able to tell a knit stitch from a purl stitch can come in handy as you learn other stitches or need to fix a mistake. A purl stitch looks like rounded bumps, while a knit stitch looks like flat “v” shapes.
If you think you’ve made a mistake in your purl row, always take a moment to look at your fabric. If you see row after row of just purl bumps, you’re good to go!
Surprise! The purl stitch is actually related to the knit stitch! Knit and purl stitches are actually the opposite sides of the same stitch. The backside of a purl stitch IS a knit stitch. This means that when you learn how to knit and purl, you’re unlocking a whole world of textures and stitches.
Understanding that knitting and purling are related will come in handy when you want to knit either stockinette stitch or garter stitch projects. Stockinette stitch knitting is done by alternating rows of knit and purl stitches. Garter stitch knitting is done by either knitting every row or purling every row.
If you’d like to learn more about how either stockinette stitch or garter stitch works, go ahead and click the links for the full tutorials!
The beginner purl stitch is one of the most basic and versatile stitches in knitting. It can be used to create a wide variety of textures and patterns and is often used in combination with other stitches to create more complex designs.
The purl stitch knitting technique is a basic stitch. It is often used in combination with the knit stitch to create textured patterns in fabric. The purl stitch can also be used on its own to create a textured fabric with a slightly different appearance than the knit stitch.
Purl stitches create a textured, three-dimensional fabric that is very versatile. Purl stitches can be used to create a variety of textures, from a smooth, satin-like finish to a more nubby, textured fabric. Purl stitches can also be combined with other stitches to create a variety of patterns and designs.


