How to Knit a Dishcloth: The 4-Step Easy Garter Stitch
Knit the garter stitch dishcloth with me!
Knit the garter stitch dishcloth with me!
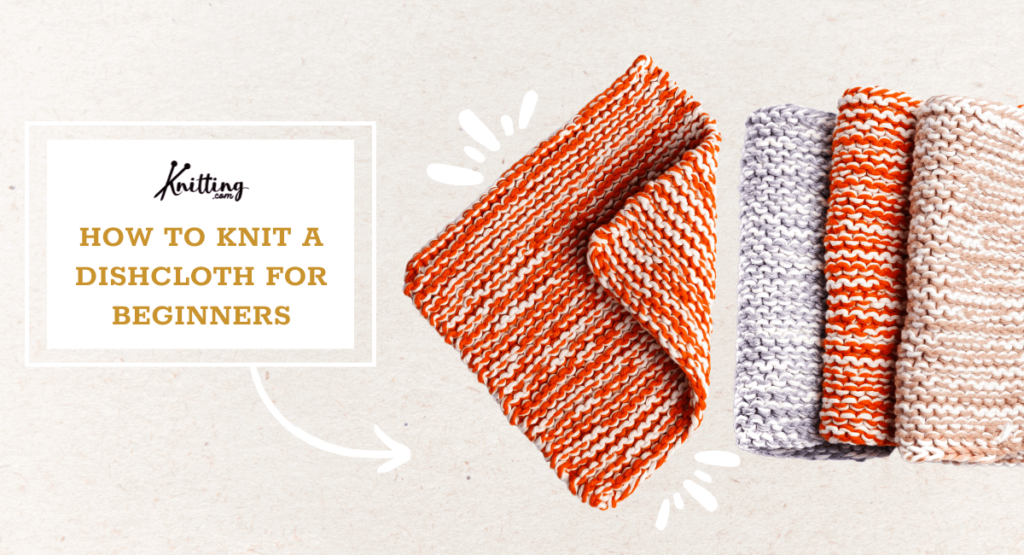
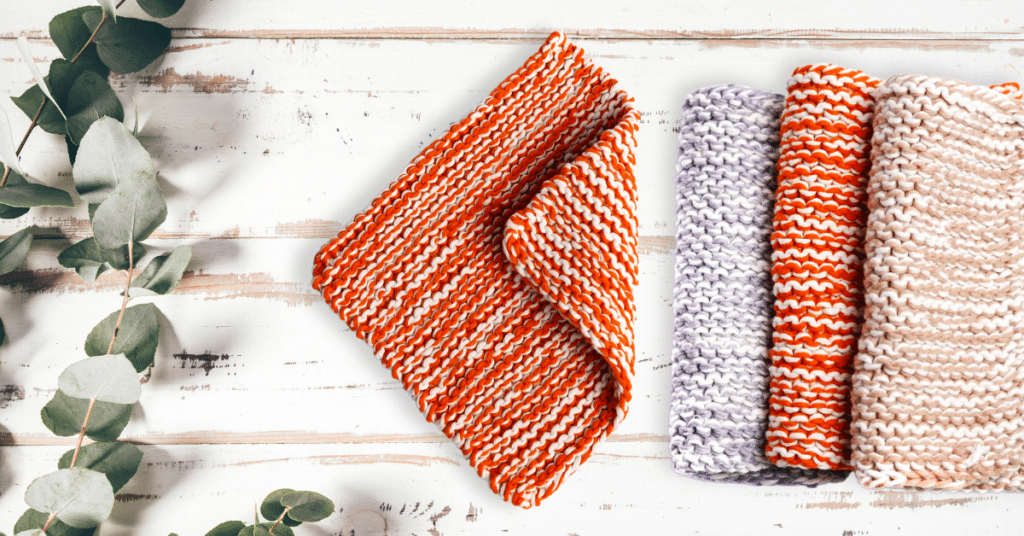
These oh-so-easy garter stitch knit dishcloths or washcloths are great beginner knitting projects. Two strands of worsted-weight cotton are held together to create a squishy, soft fabric. For a fun color effect try holding two different colored yarns together to create a speckled or “marbled” fabric. A set of three cloths make a lovely present when knit in color-coordinating yarns too!
The pattern instructions will make a single knit dishcloth that is approximately 8″ square.
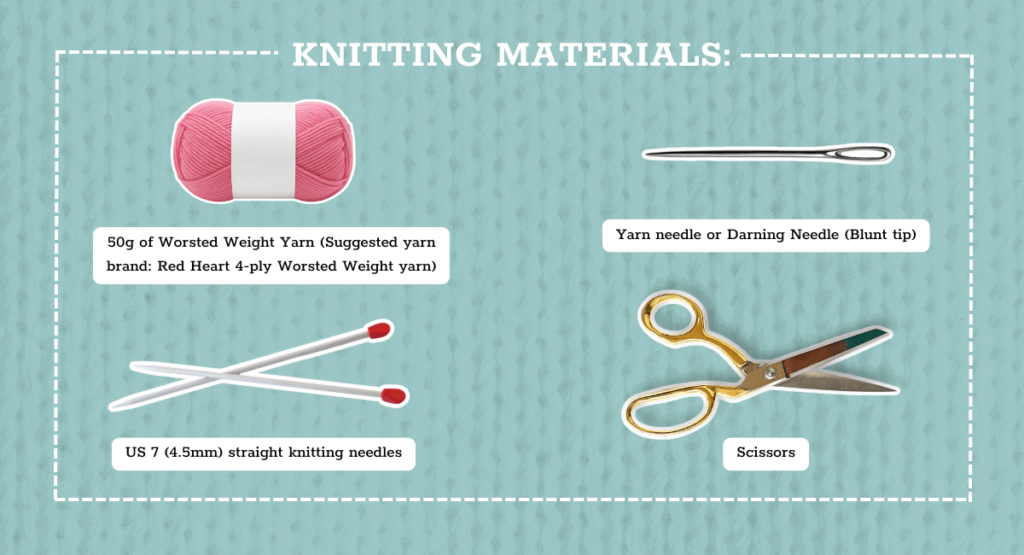
Ready to knit up a whole stack of soft and squishy dishcloths or washcloths? Click the button below to download the PDF with everything you need to whip up your very own dishcloth in a flash.
We have a quick tutorial above showing you how to make this super squishy garter stitch dishcloth pattern. But the cast on we’re using there is the long tail cast on.
We’re dialing back the difficulty level by using the basic knitted cast on for this blog tutorial instead!
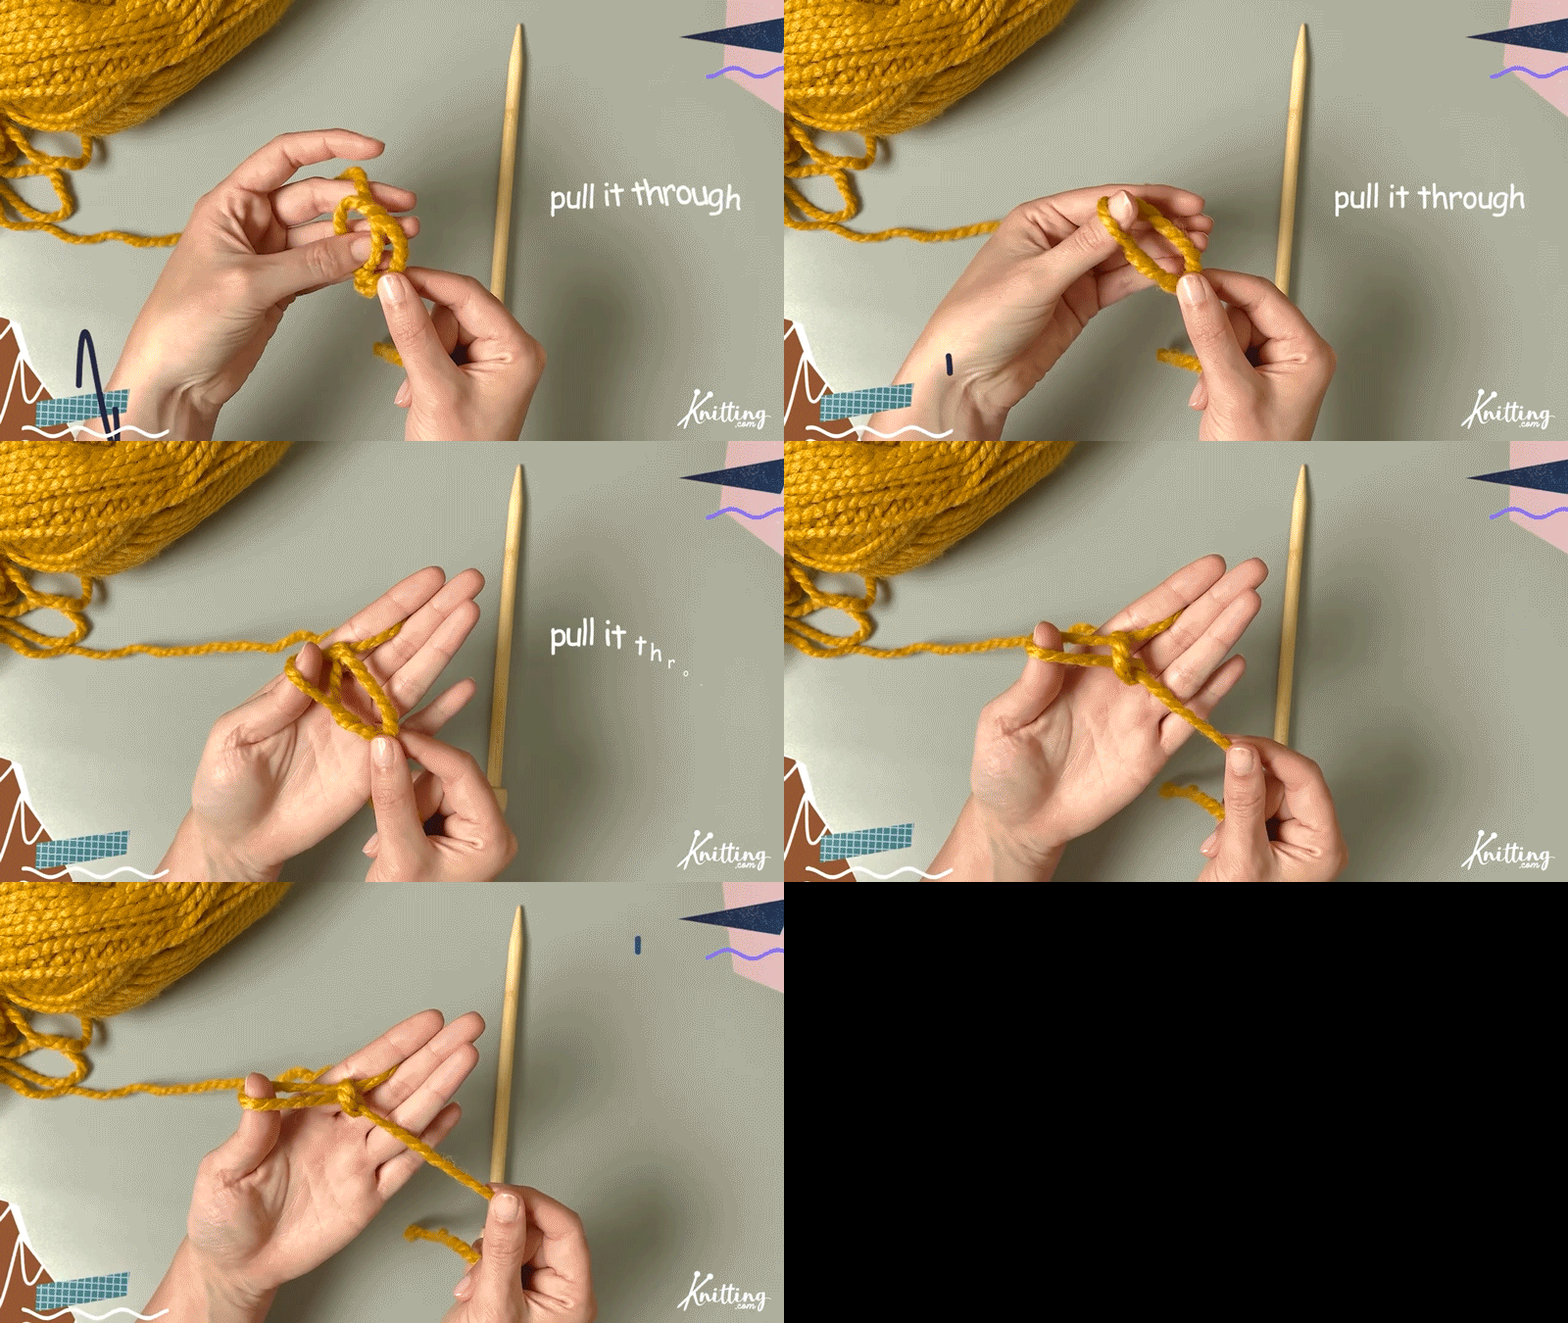
Making a slip knot is the very first thing you do before you start knitting.
This is an adjustable knot that you will use to attach your yarn onto your knitting needle.
Here’s an easy tutorial!
Take your yarn tail and hold it between both hands like so.
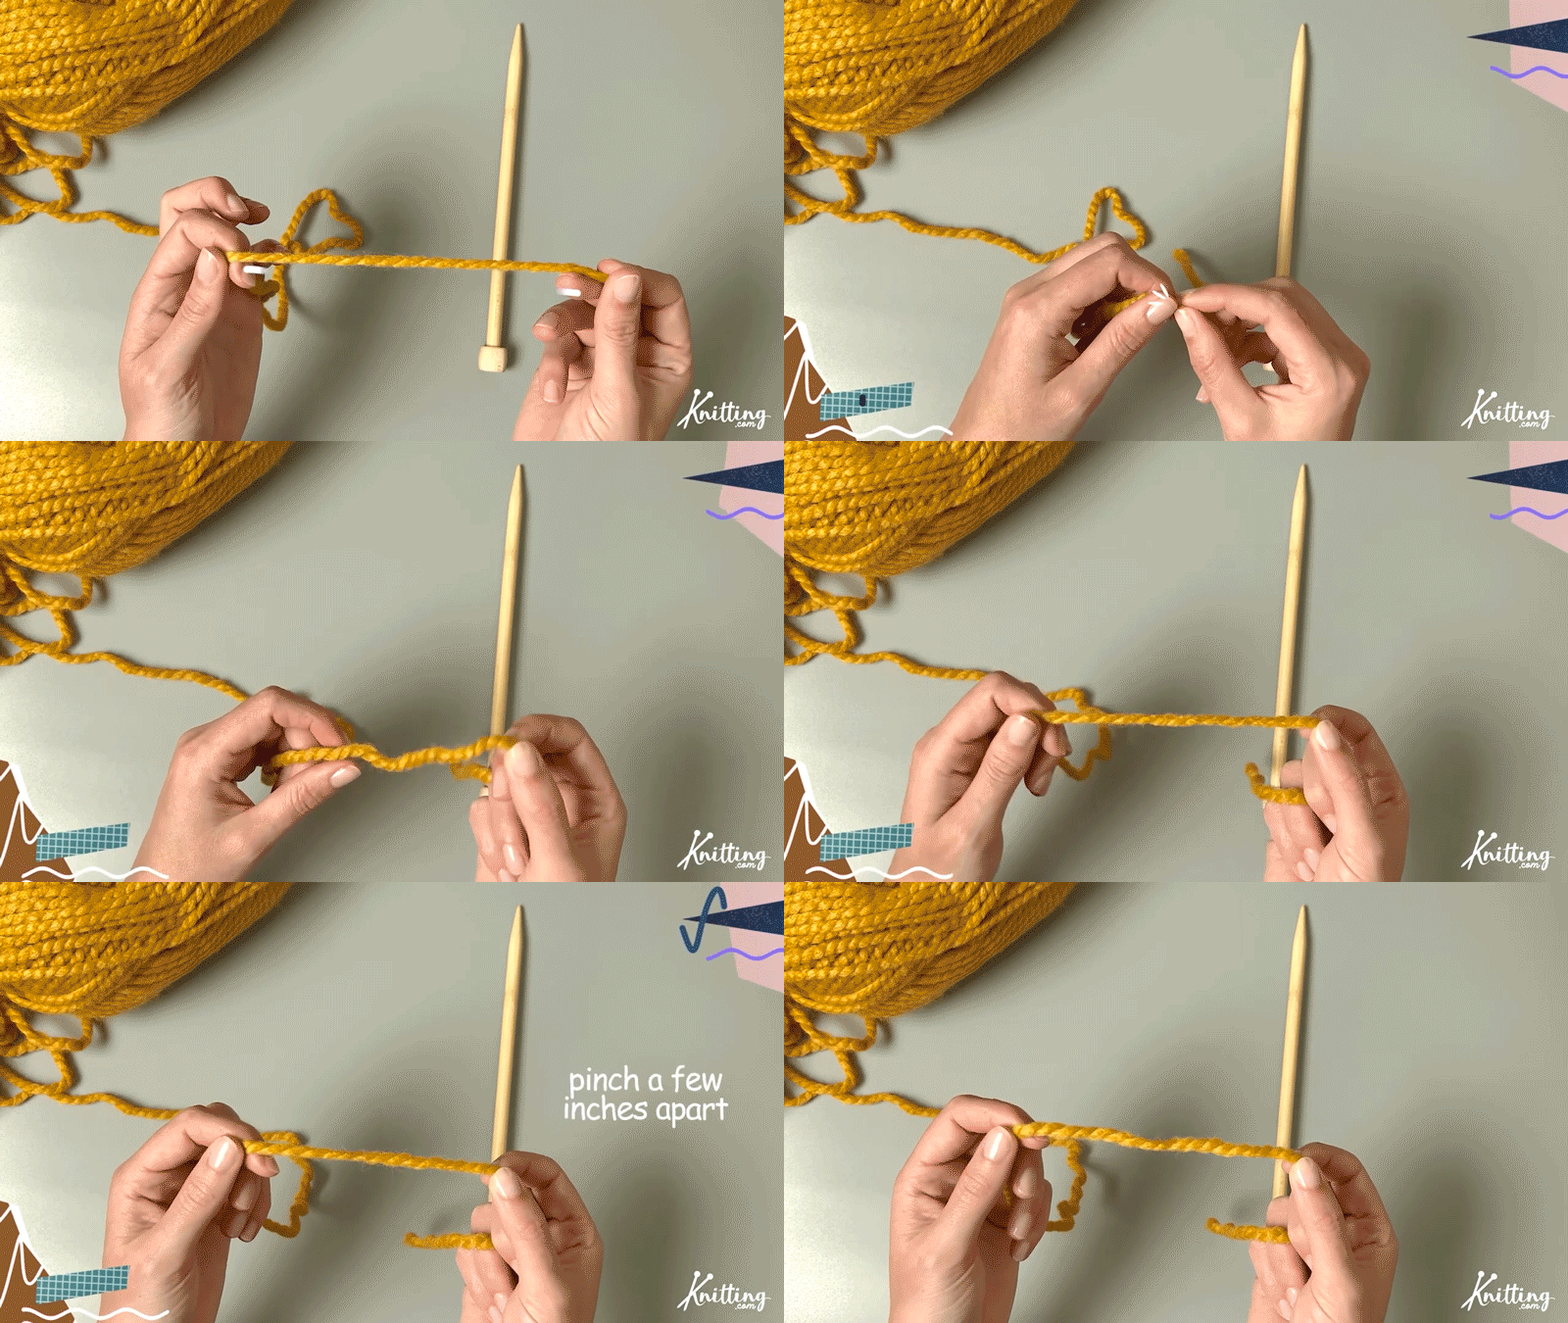
Twist the tail end of the yarn ( or the end of your yarn) over the other to form a small loop.
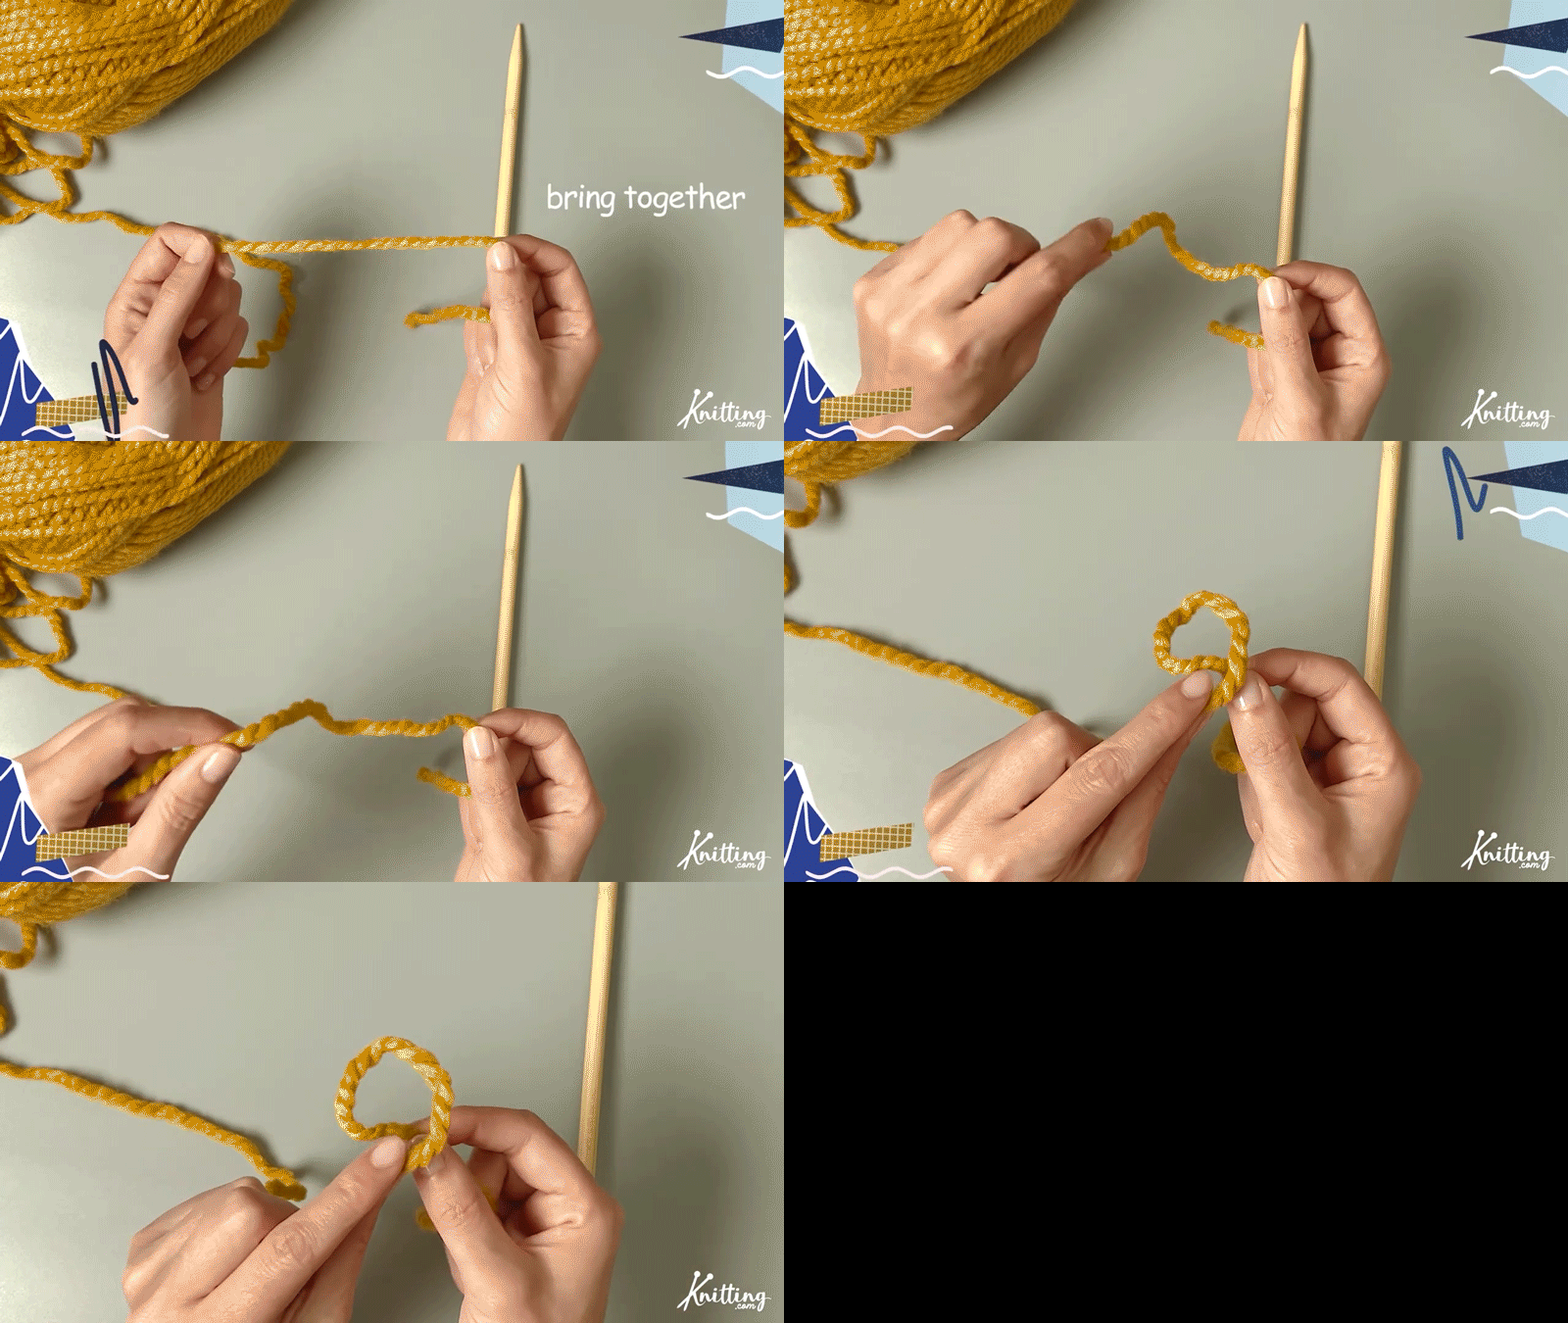
Pinch the middle of the loop with your thumb to hold it in place.
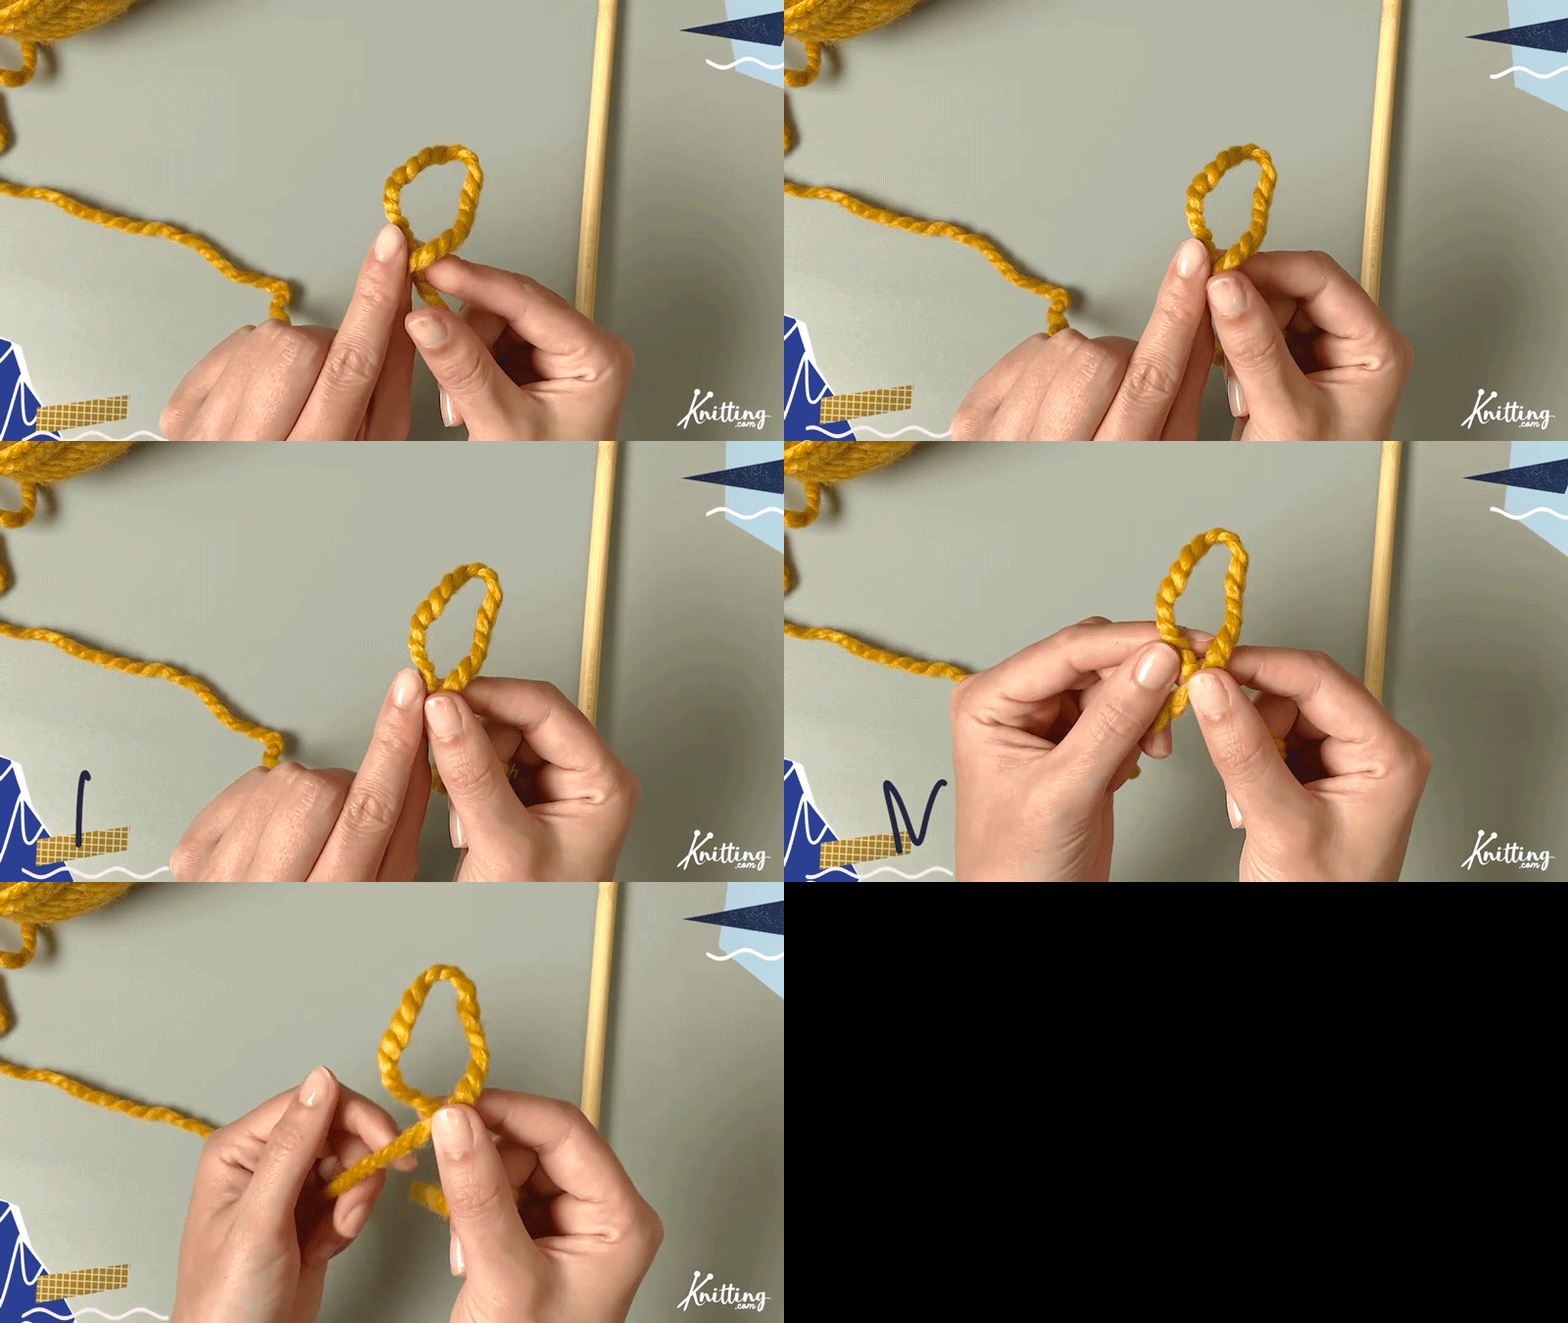
Position the yarn tail behind the loop and grab it with your free hand.
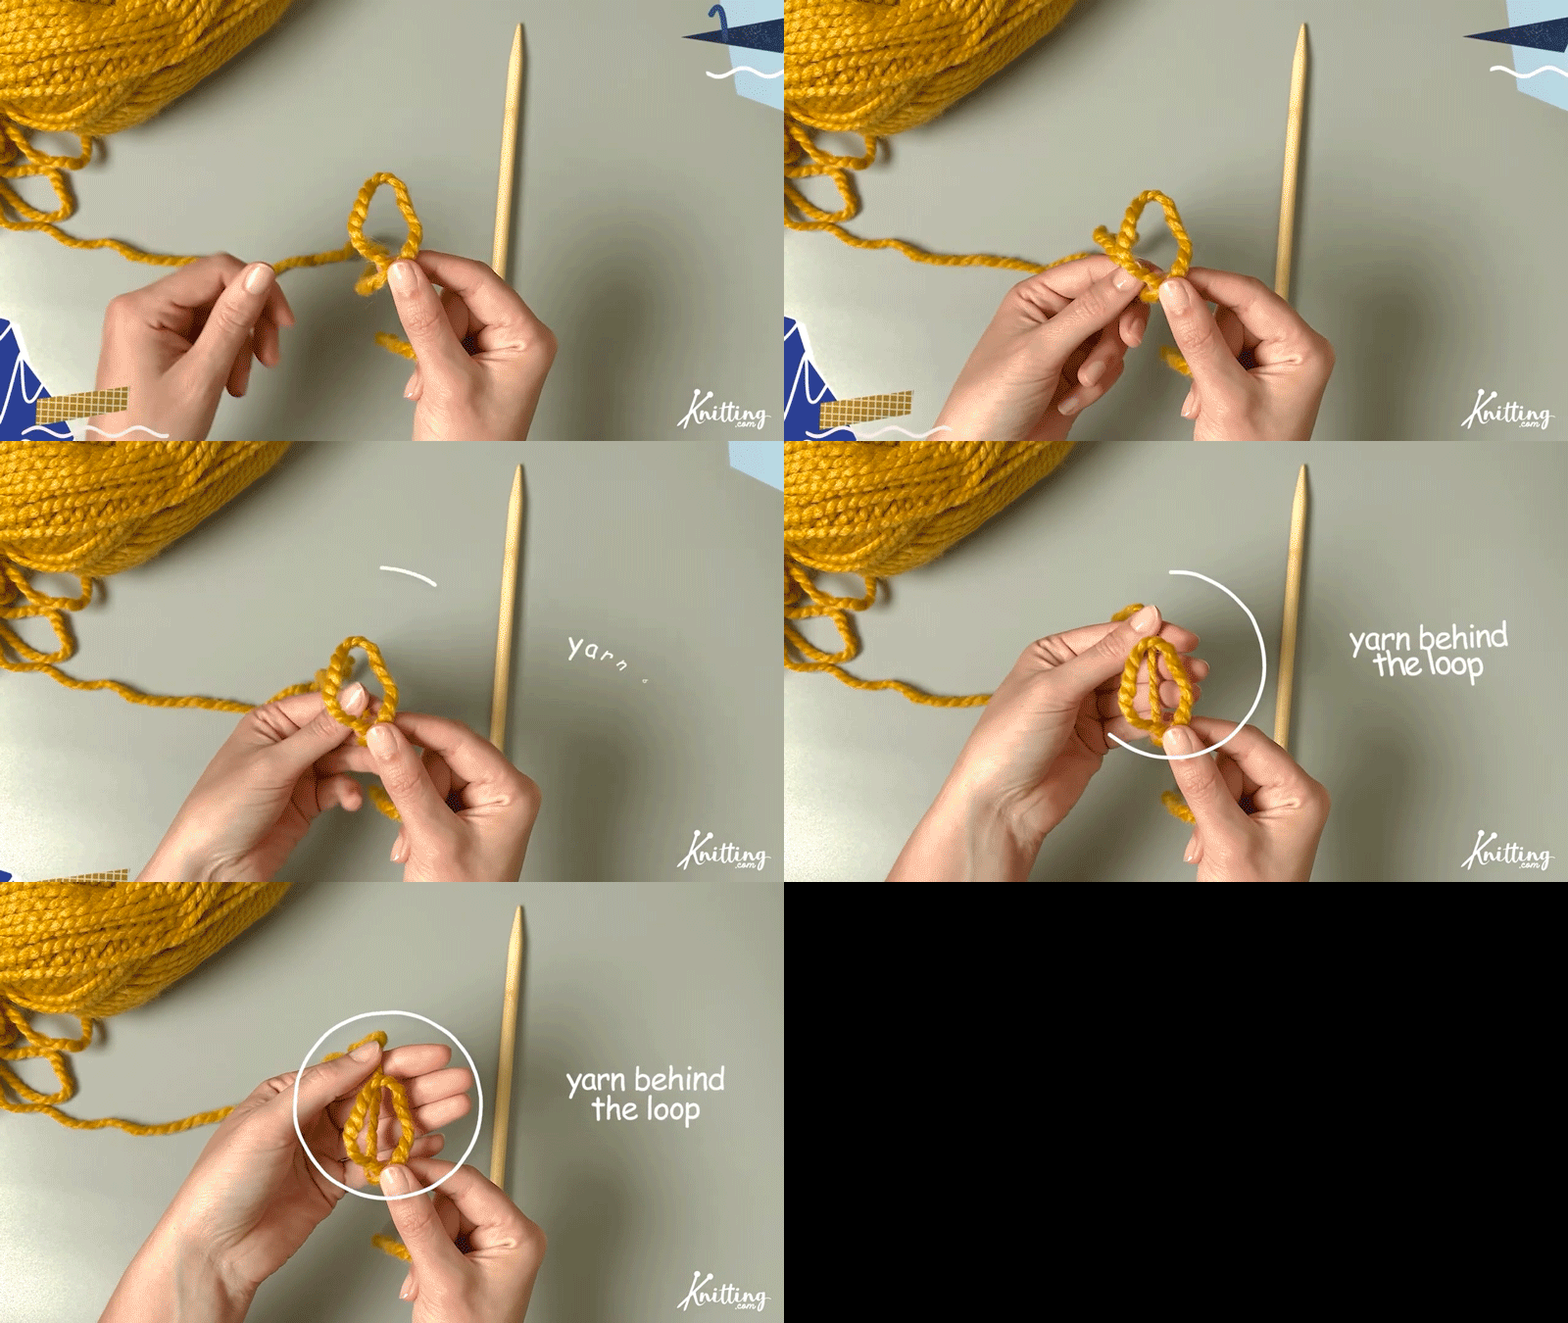
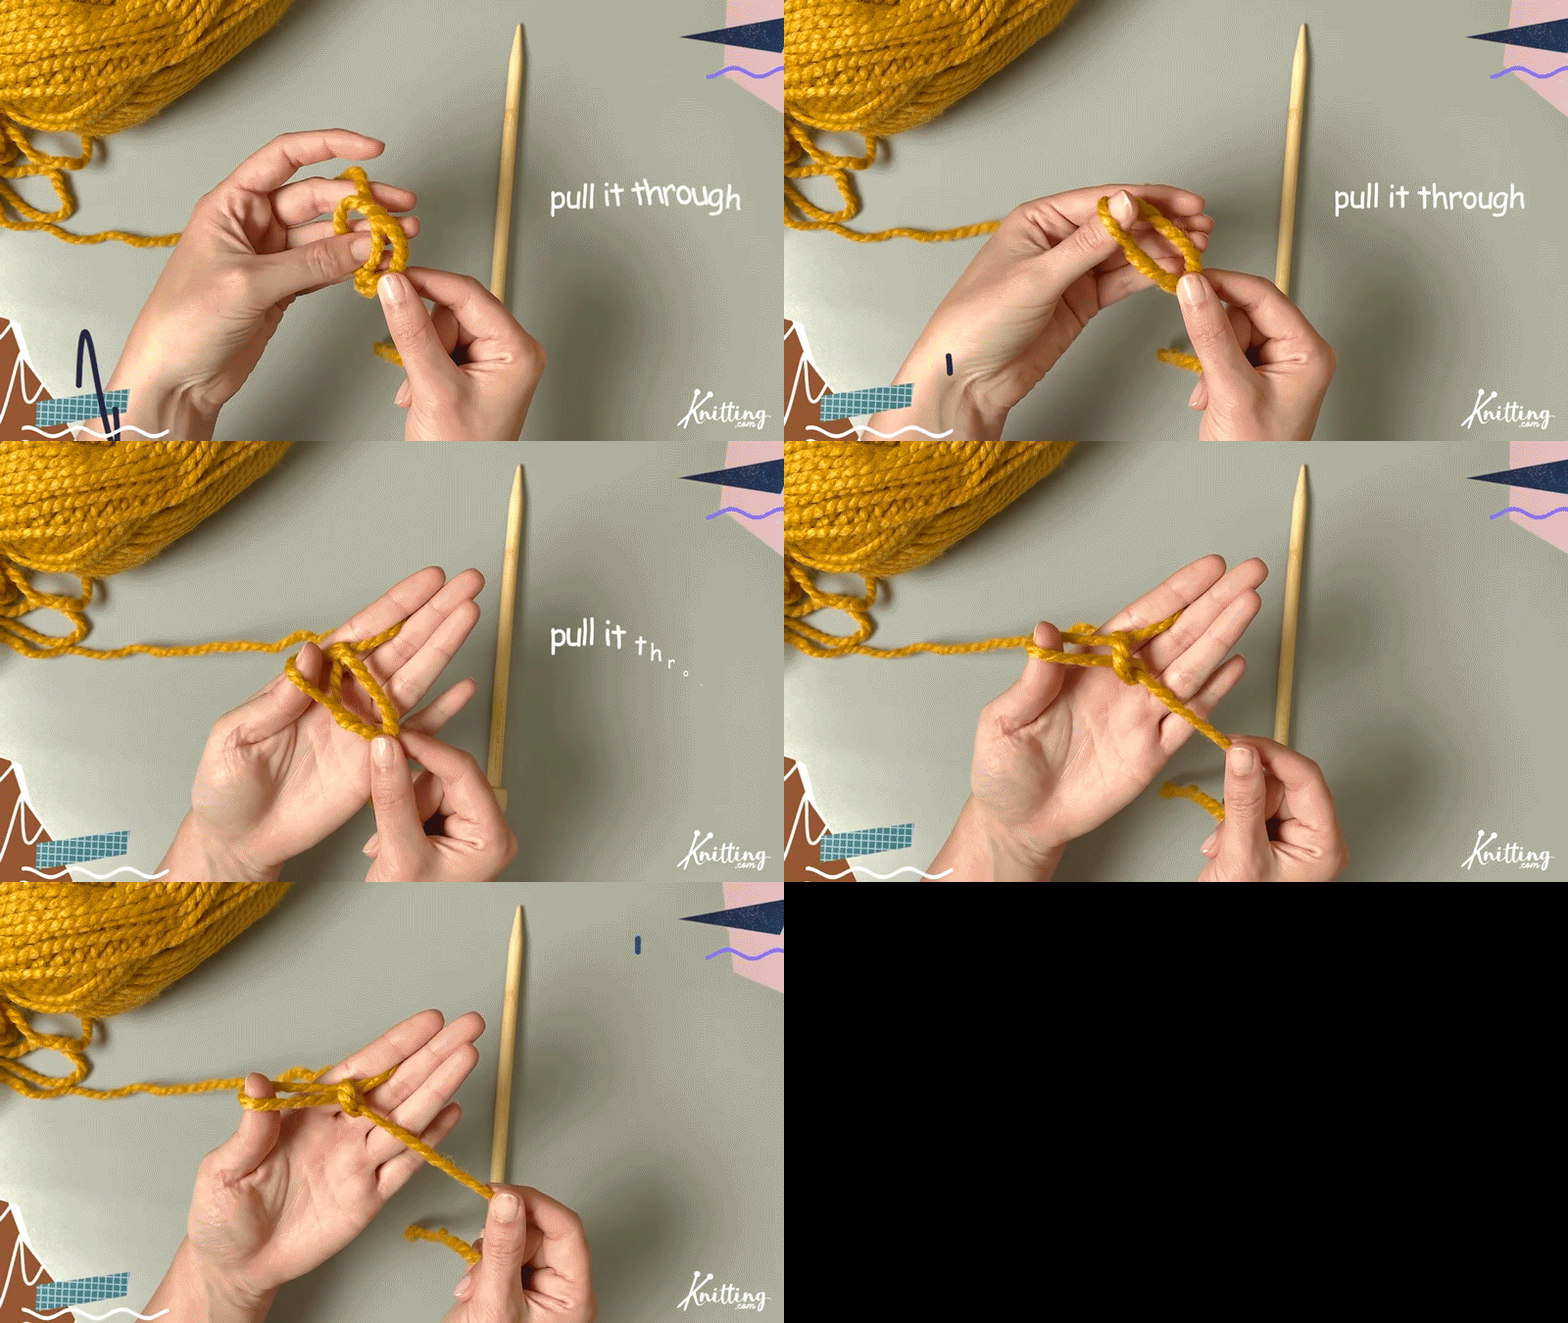
Hold on to the new loop while tugging on both the yarn strands below.
Now you have a slip knot!
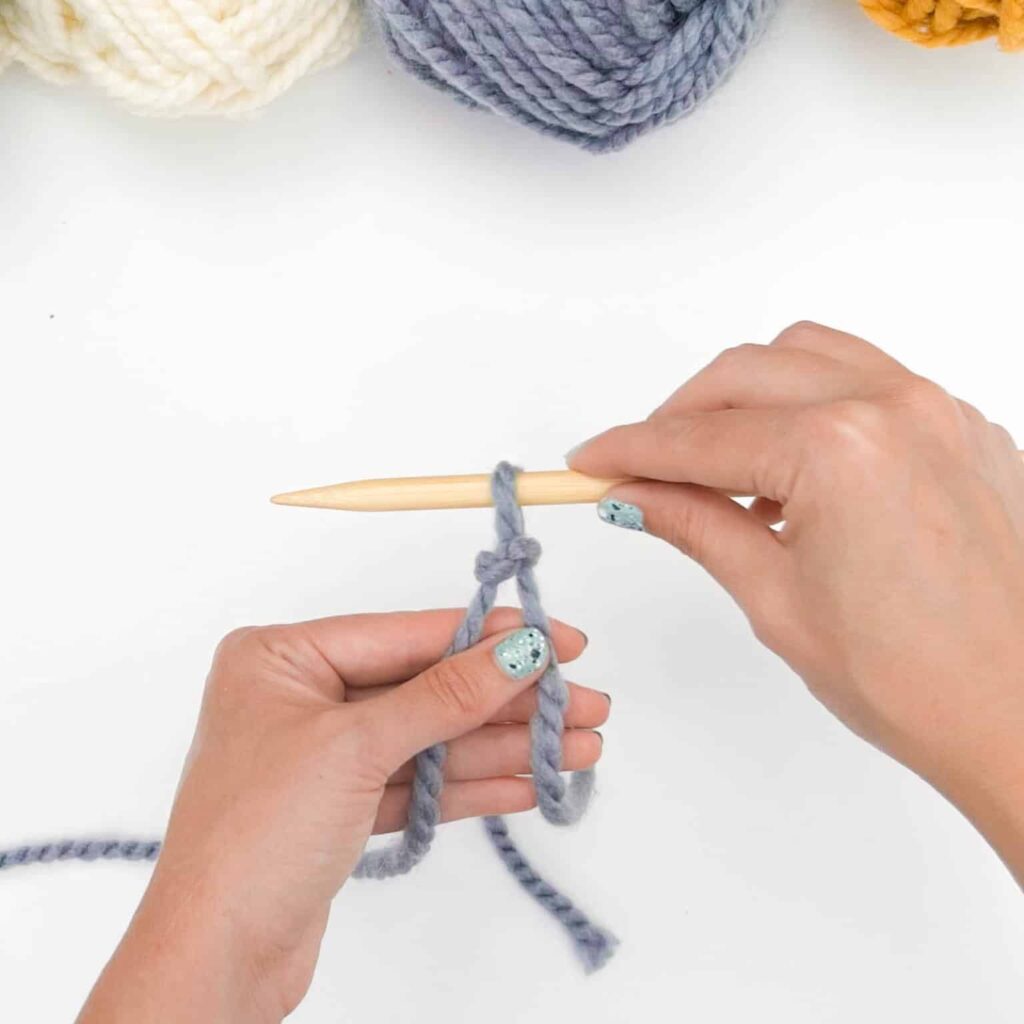
Place the slip knot onto your knitting needle. Now you’re ready to start knitting your very first squishy dishcloth!
This tutorial will use the basic knitted cast on, garter stitch, and basic knitted cast off for the whole pattern. Let’s start!
“Casting on” refers to attaching your yarn onto your knitting needle using loops. There are many ways to cast on stitches. But today, we’re using the Basic Knitted Cast On!
The Basic Knitted Cast On is an easy, beginner-friendly knit cast on method perfect for any project that needs a nice firm edge — like this super squishy dishcloth!
It’s made the same way you make the knit stitch, but with a small twist. Here’s how:
Make sure your slip knot is already on your left knitting needle. Hold the working yarn (that strand that is still connected to the yarn ball) on your left hand.
Insert your right needle into the loop, underneath the left needle.
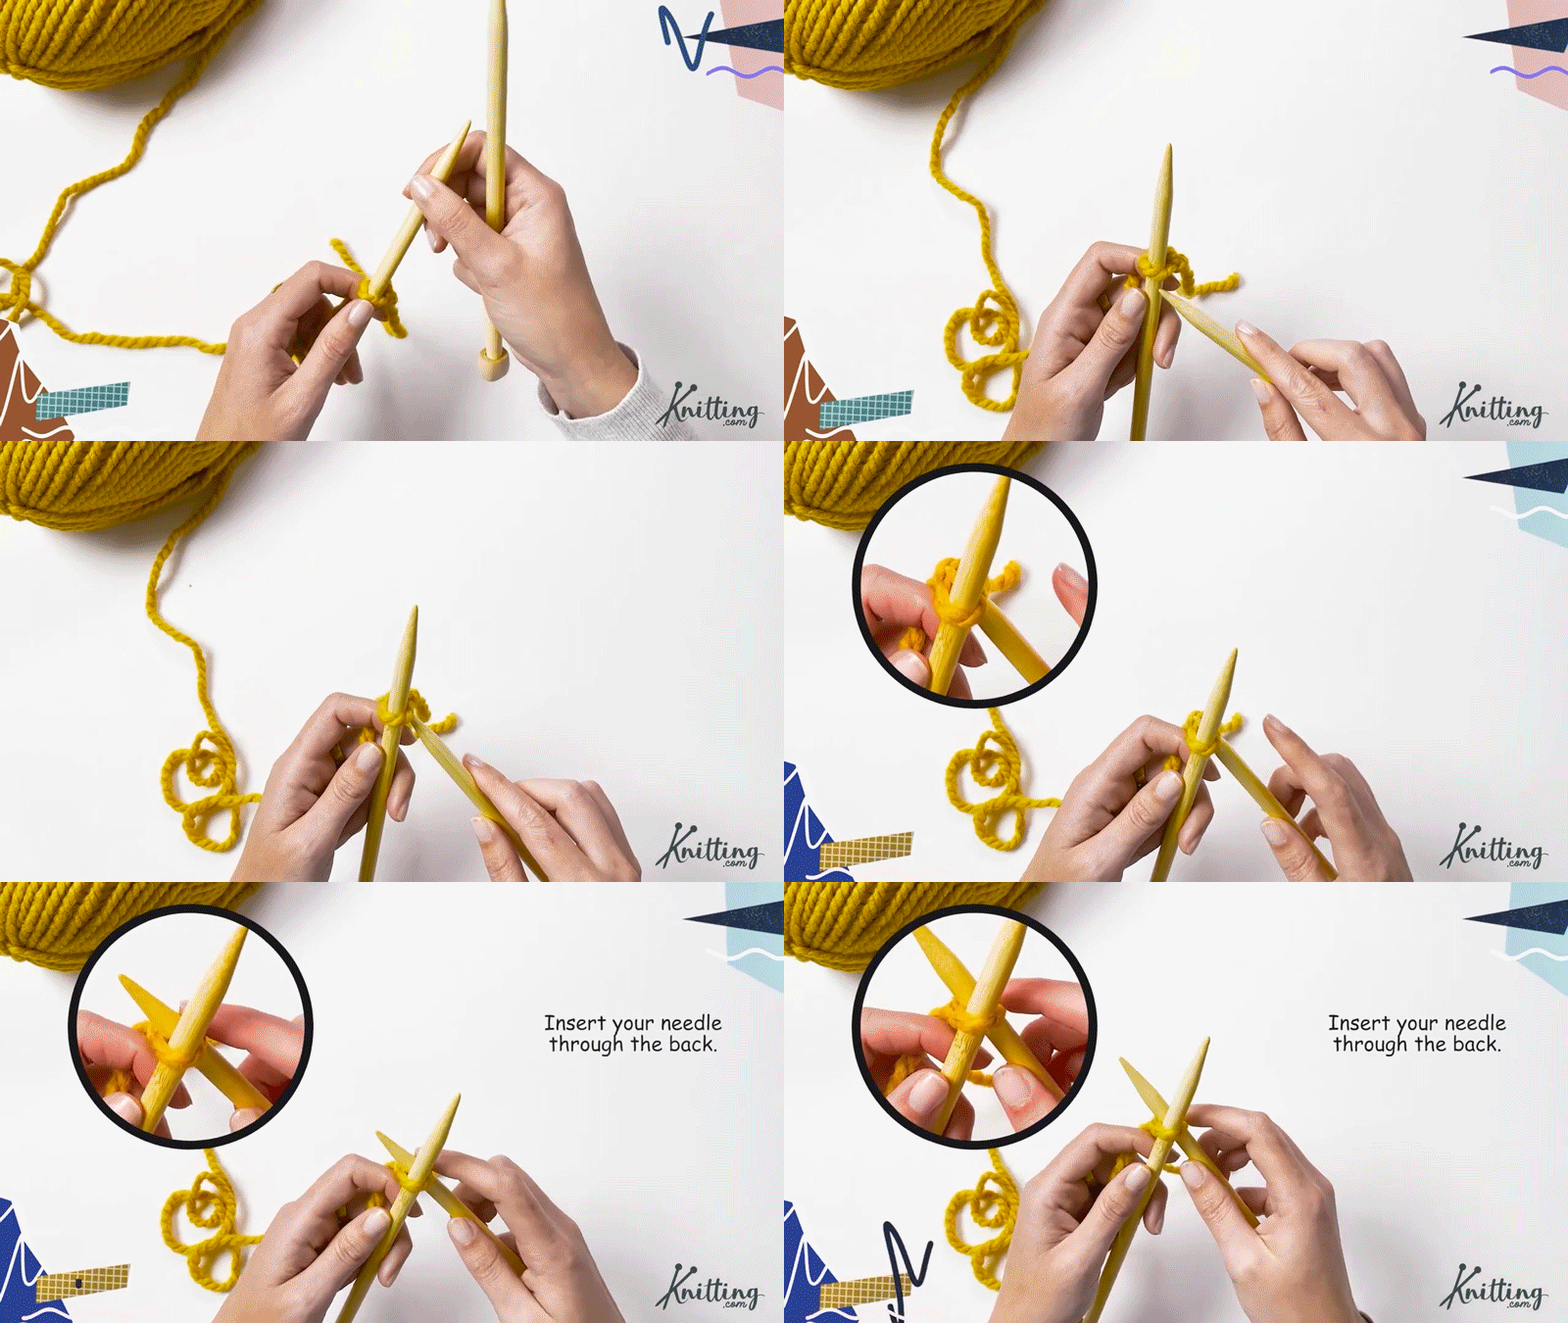
Drape your yarn over your right needle. This is called a “yarn over” or “YO” in knitting patterns.
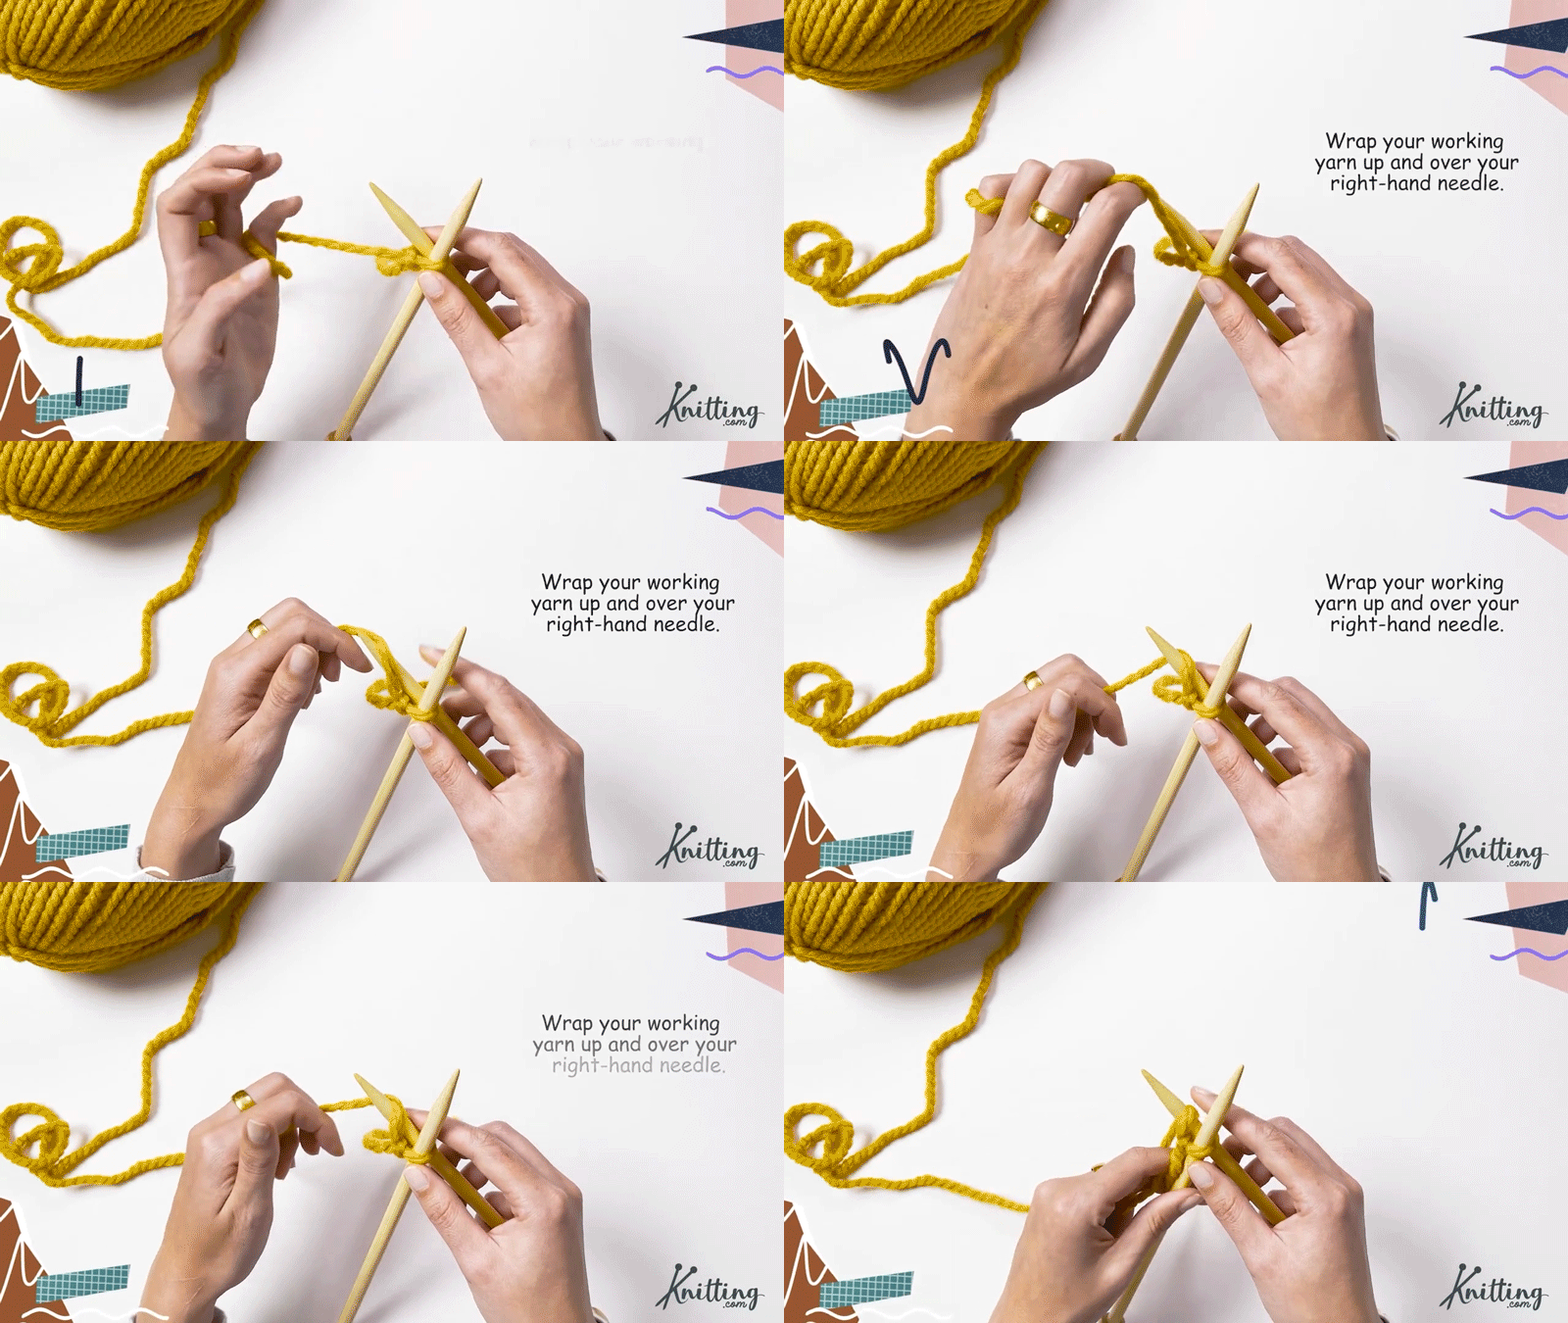
Twist your right needle towards you. You can use your right pointer finger to hold the yarn in place.
Drag your needle through the loop and out…
Like this!
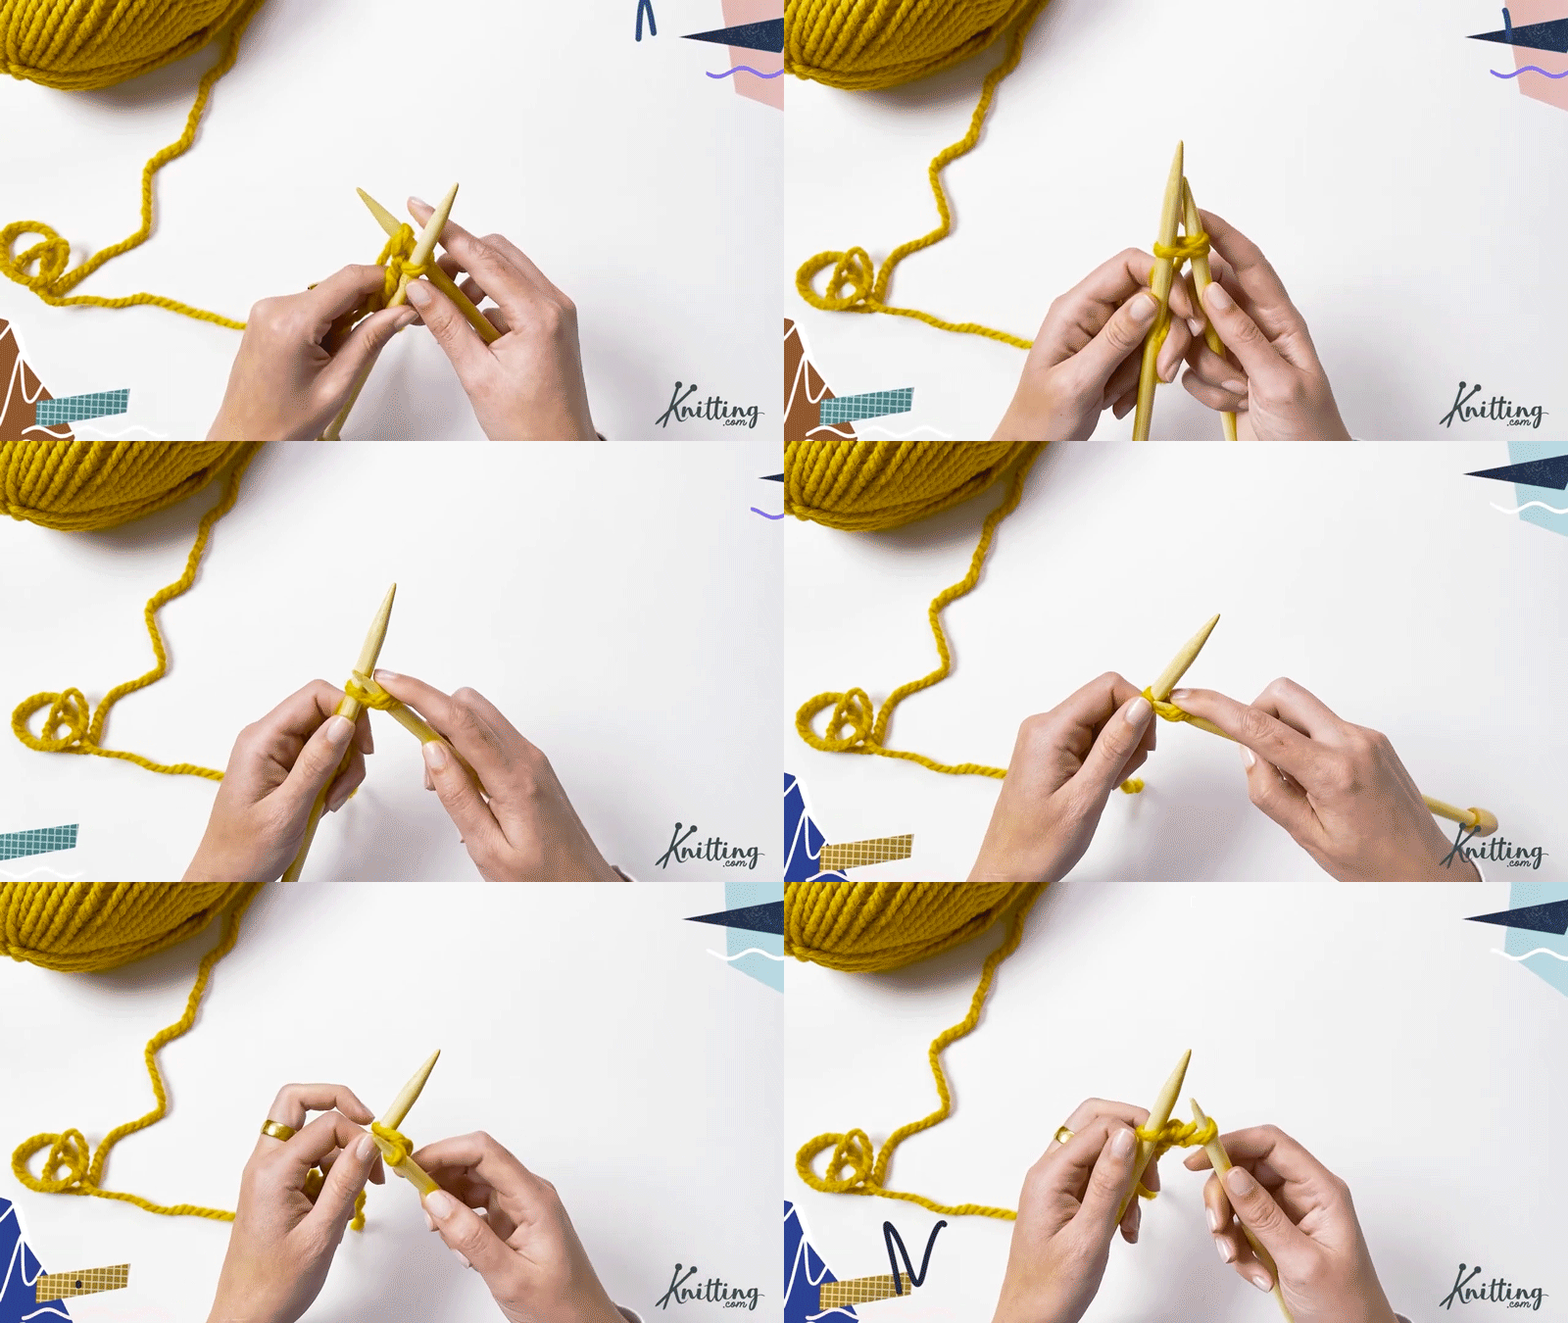
Twist your left needle towards your right hand and go through the bottom of the loop on your right needle.
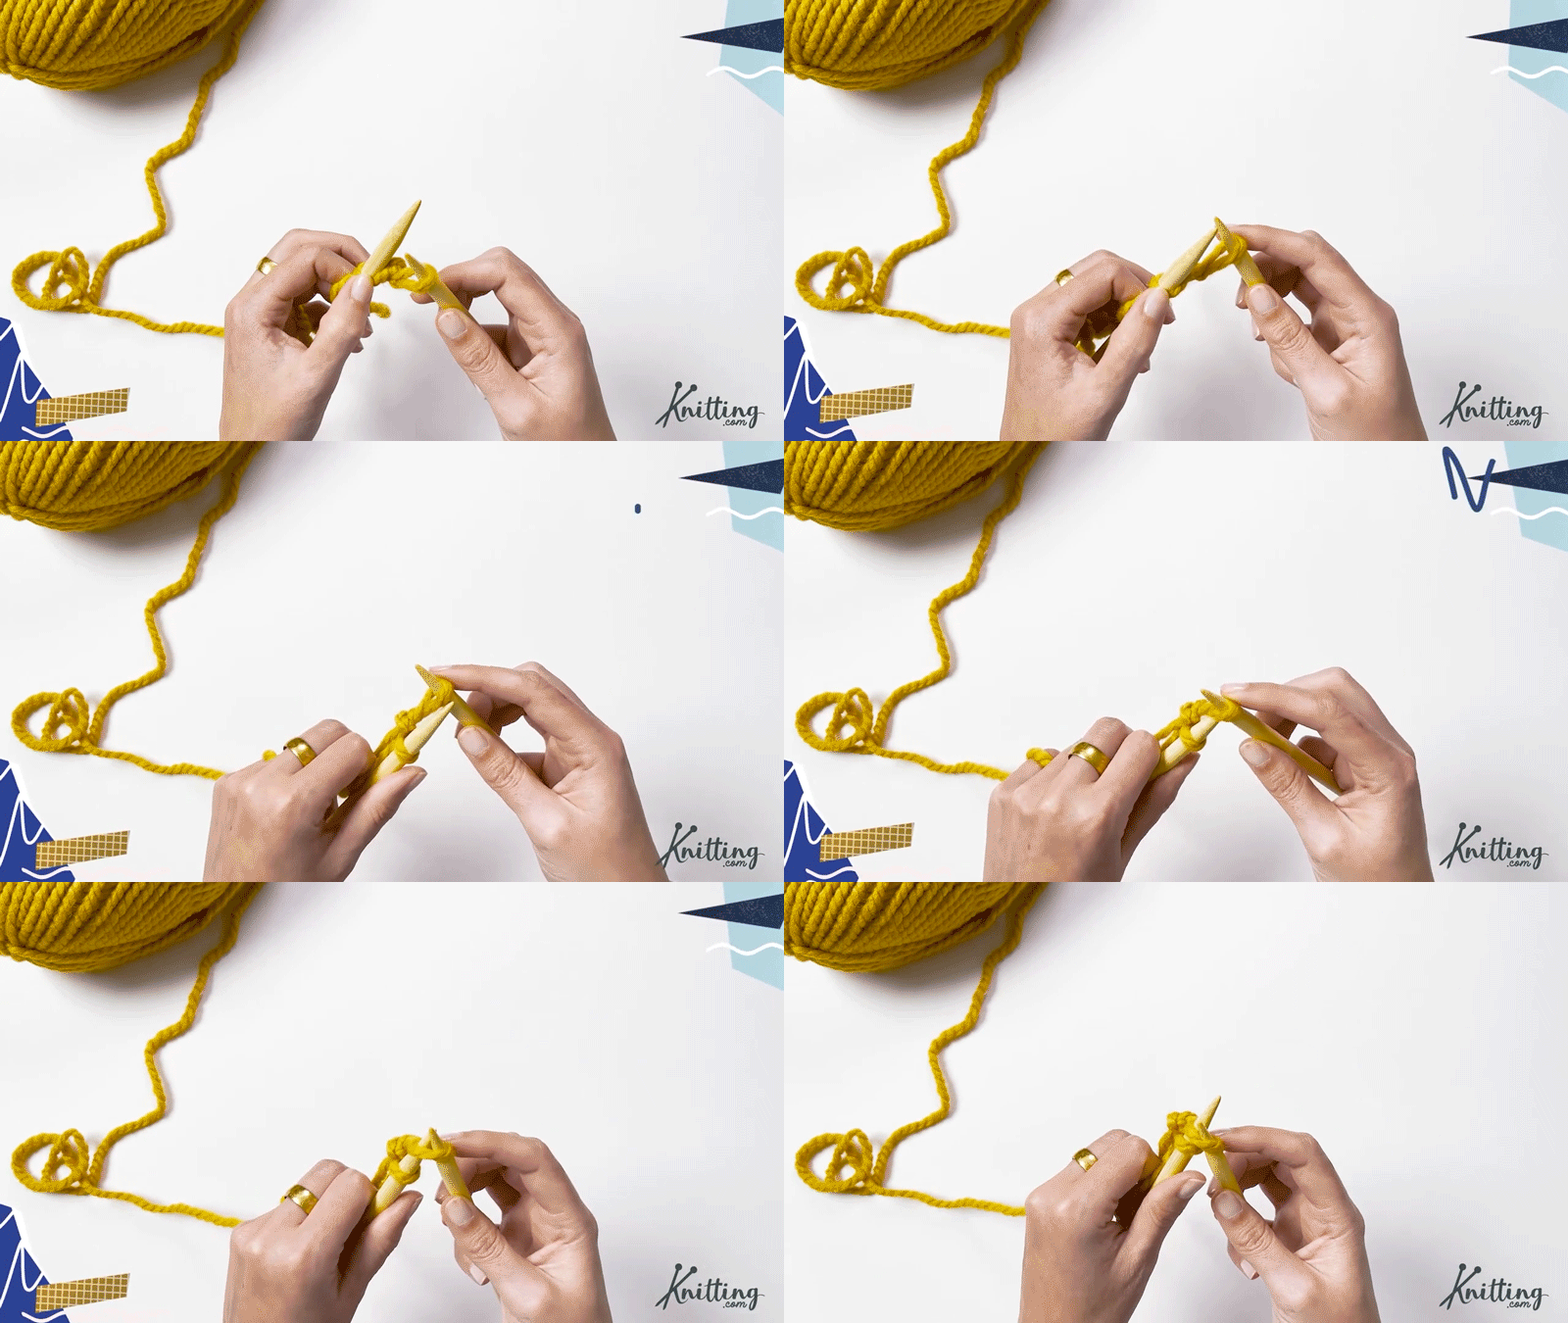
Go through the right loop like so…
Remove your right needle.
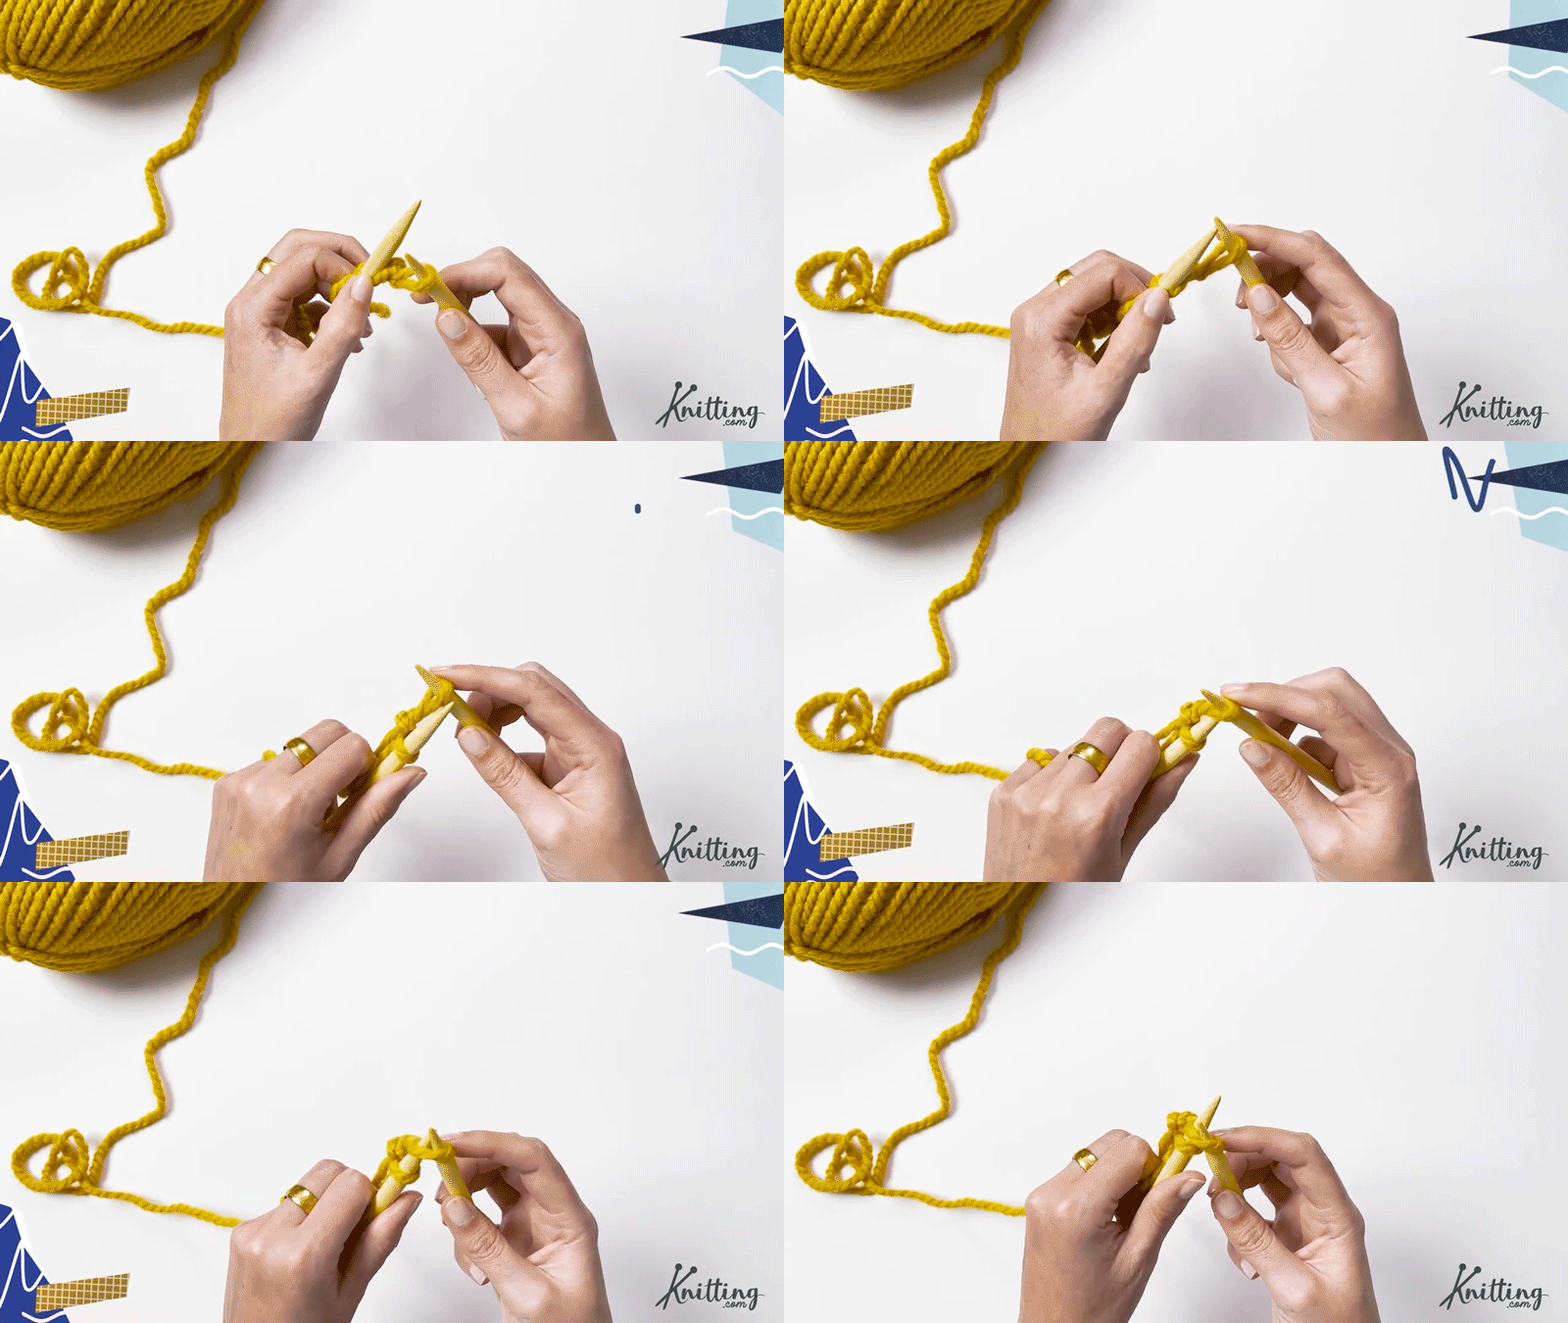
Tug on the yarn that you’re holding on your left hand.
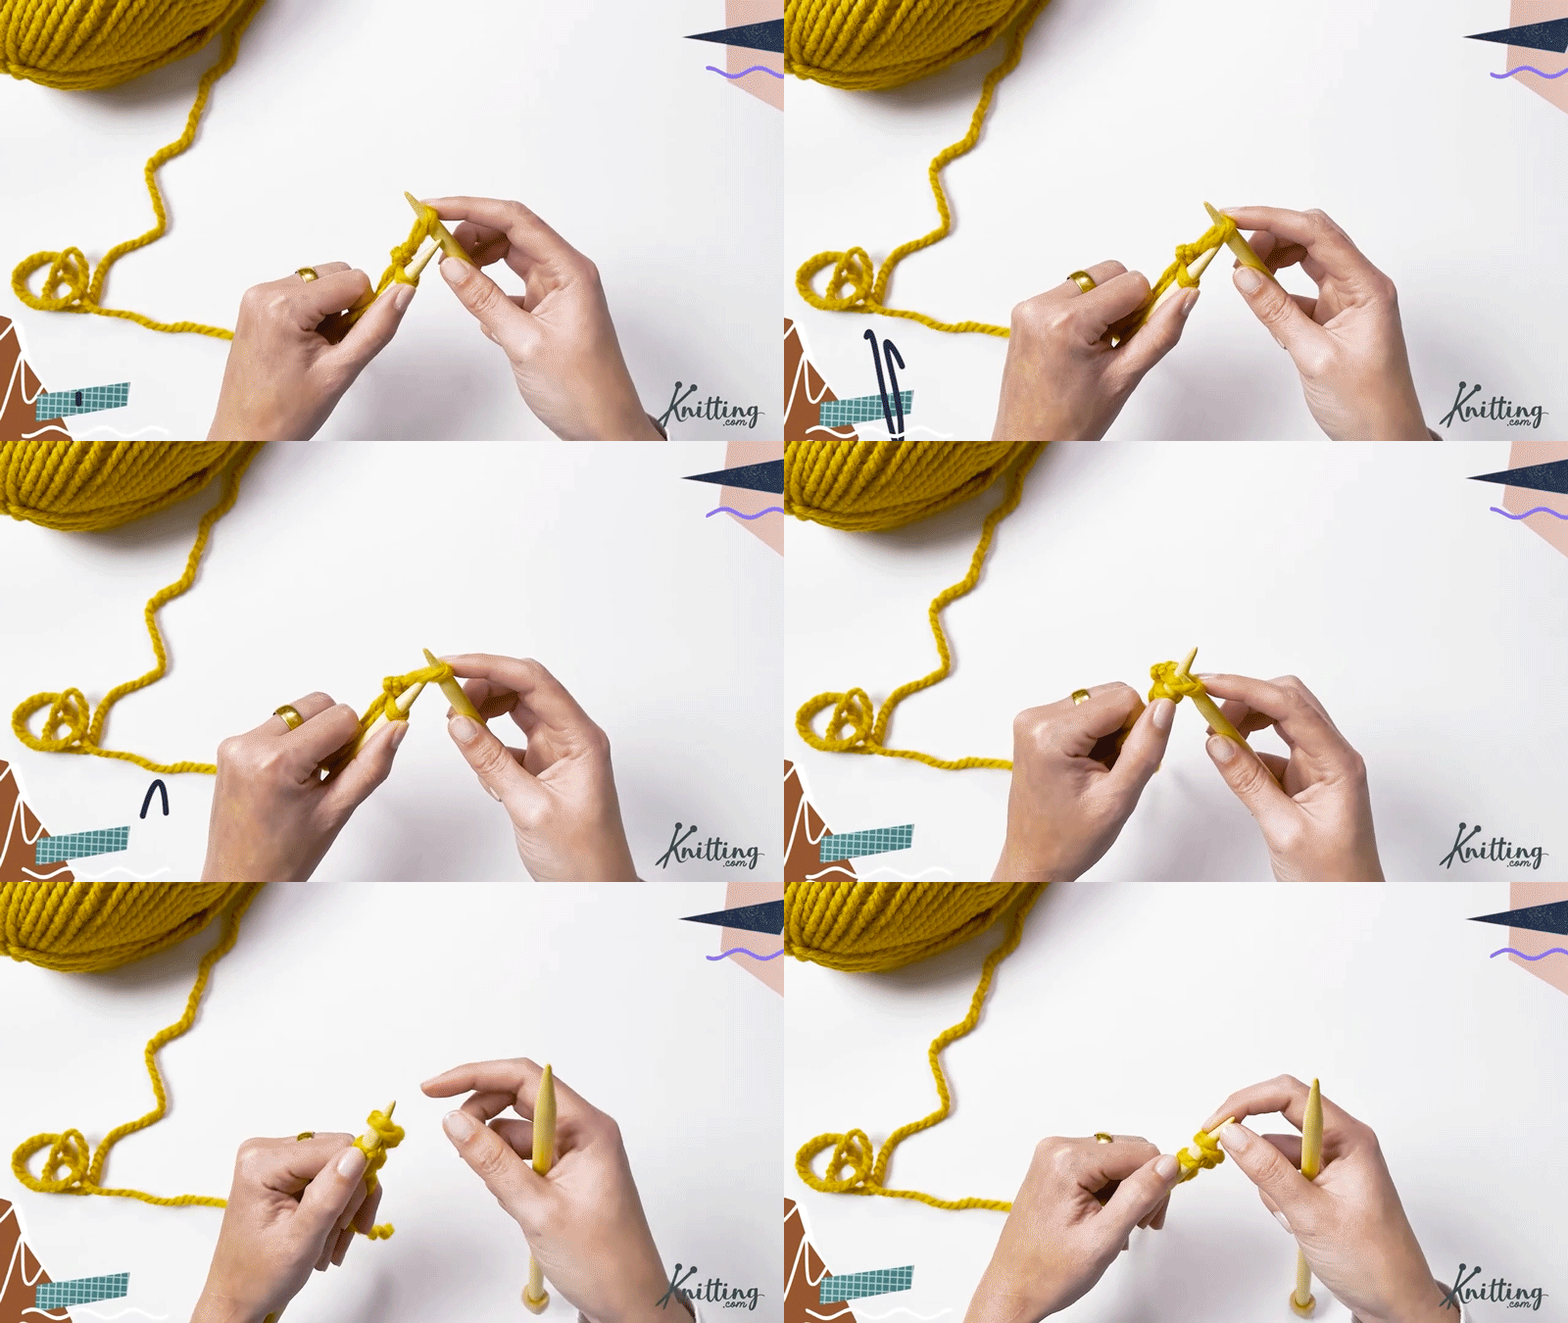
Repeat steps 1 to 5 in each NEW LOOP you make until you have 30 loops (a.k.a. stitches) on your knitting needle!
The knitting needle holding all the stitches is called the “working needle” and the yarn strand that’s still connected to the yarn ball is called the “working yarn”.
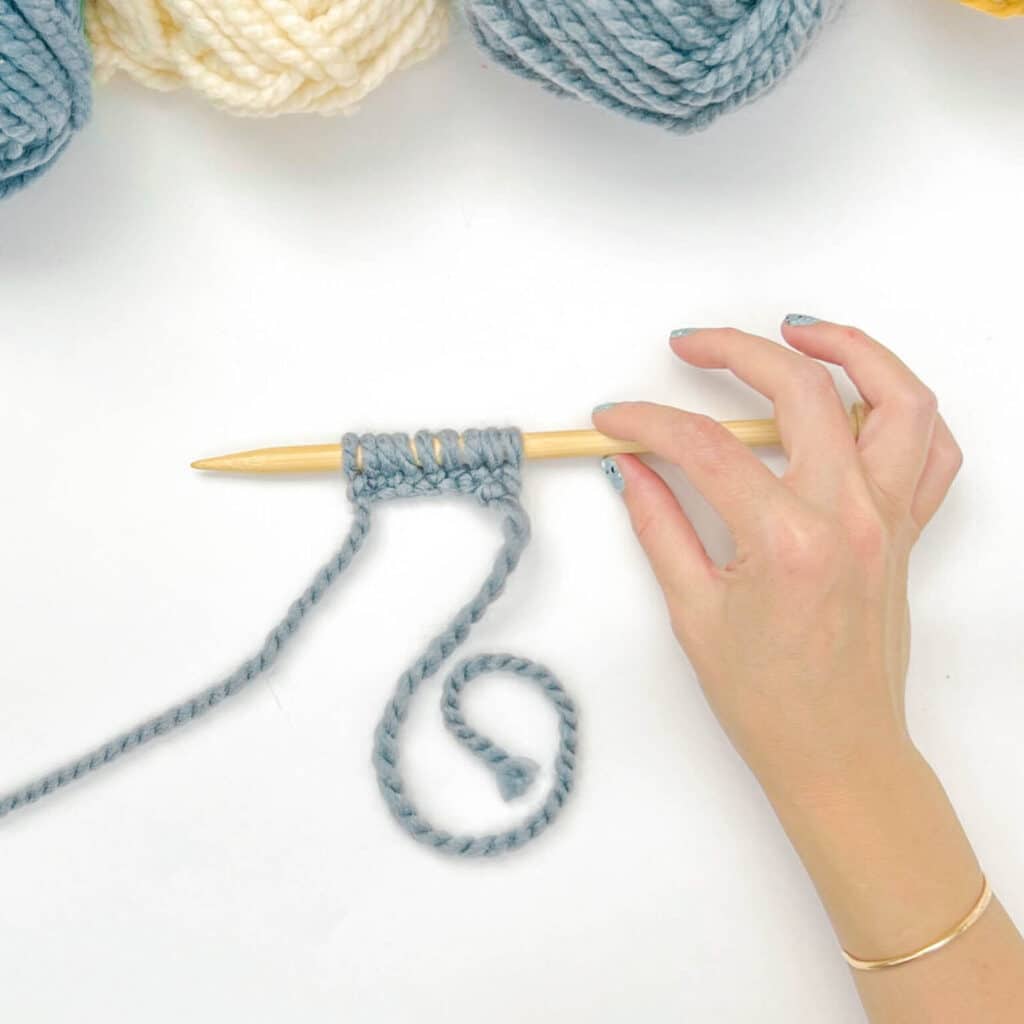
Let’s get into the meat of the pattern! The Garter Stitch is just the knit stitch repeated over and over on every row. Let’s learn how to make the knit stitch.
Insert your right knitting needle into the front loop of your left knitting needle.
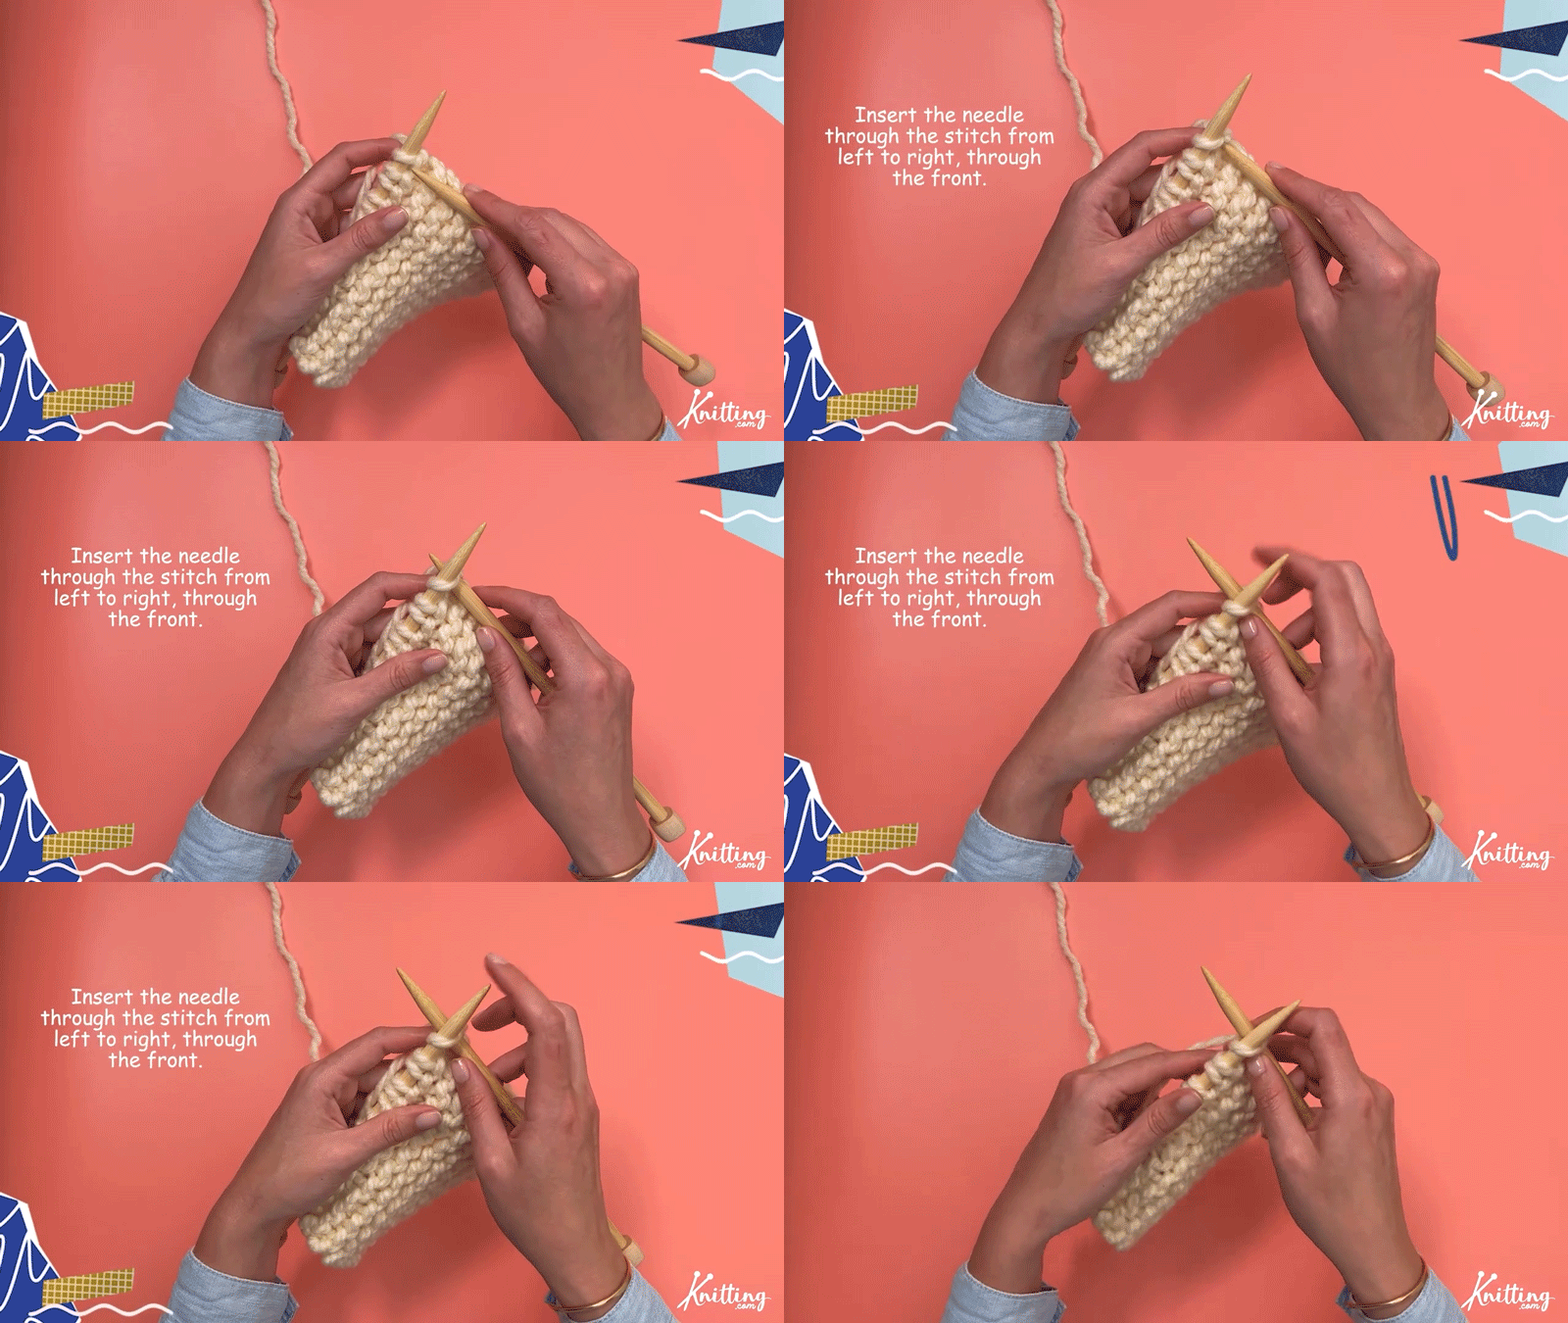
Drape the working yarn over your right needle (yarn over).
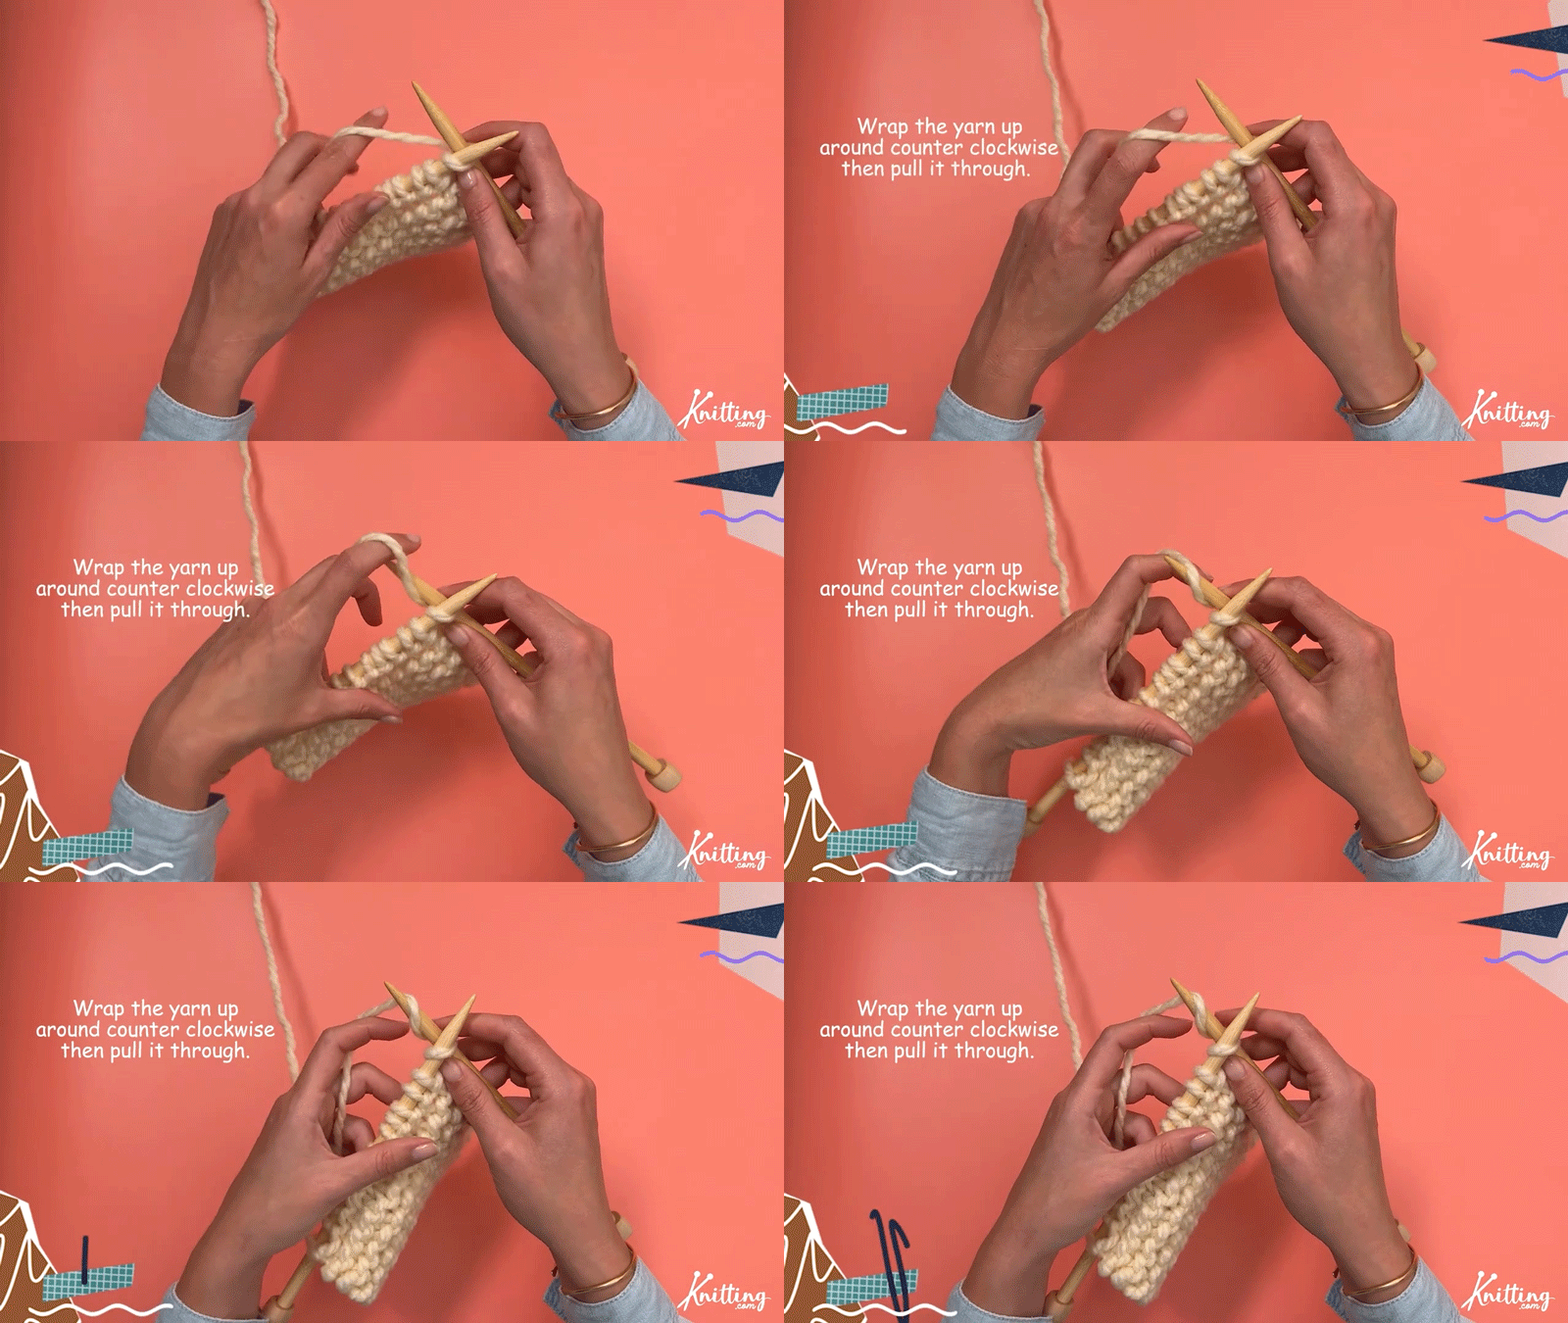
Hold down your yarn over with your right pointer finger and drag your right needle down and through the left loop.
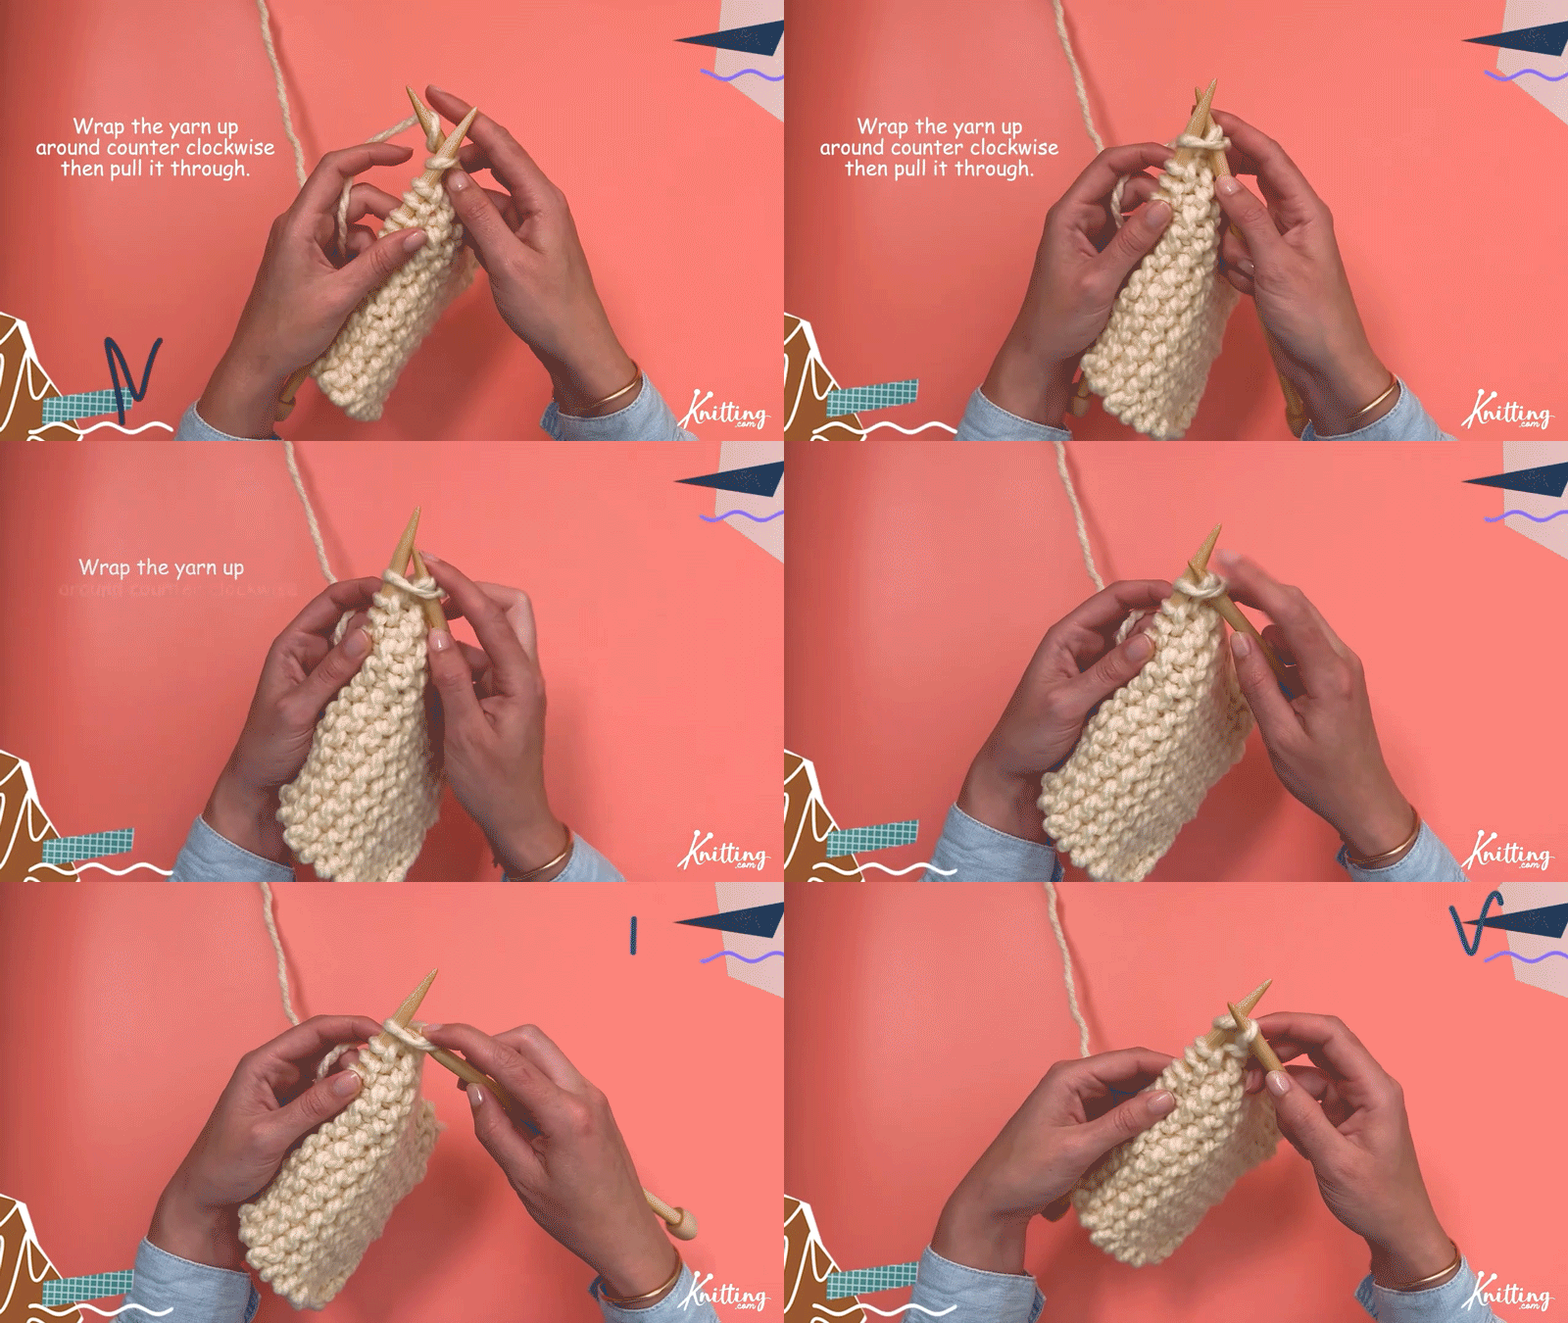
Fully remove the new loop from your left needle and hold on your right. Go back to step 1 for the next loop.
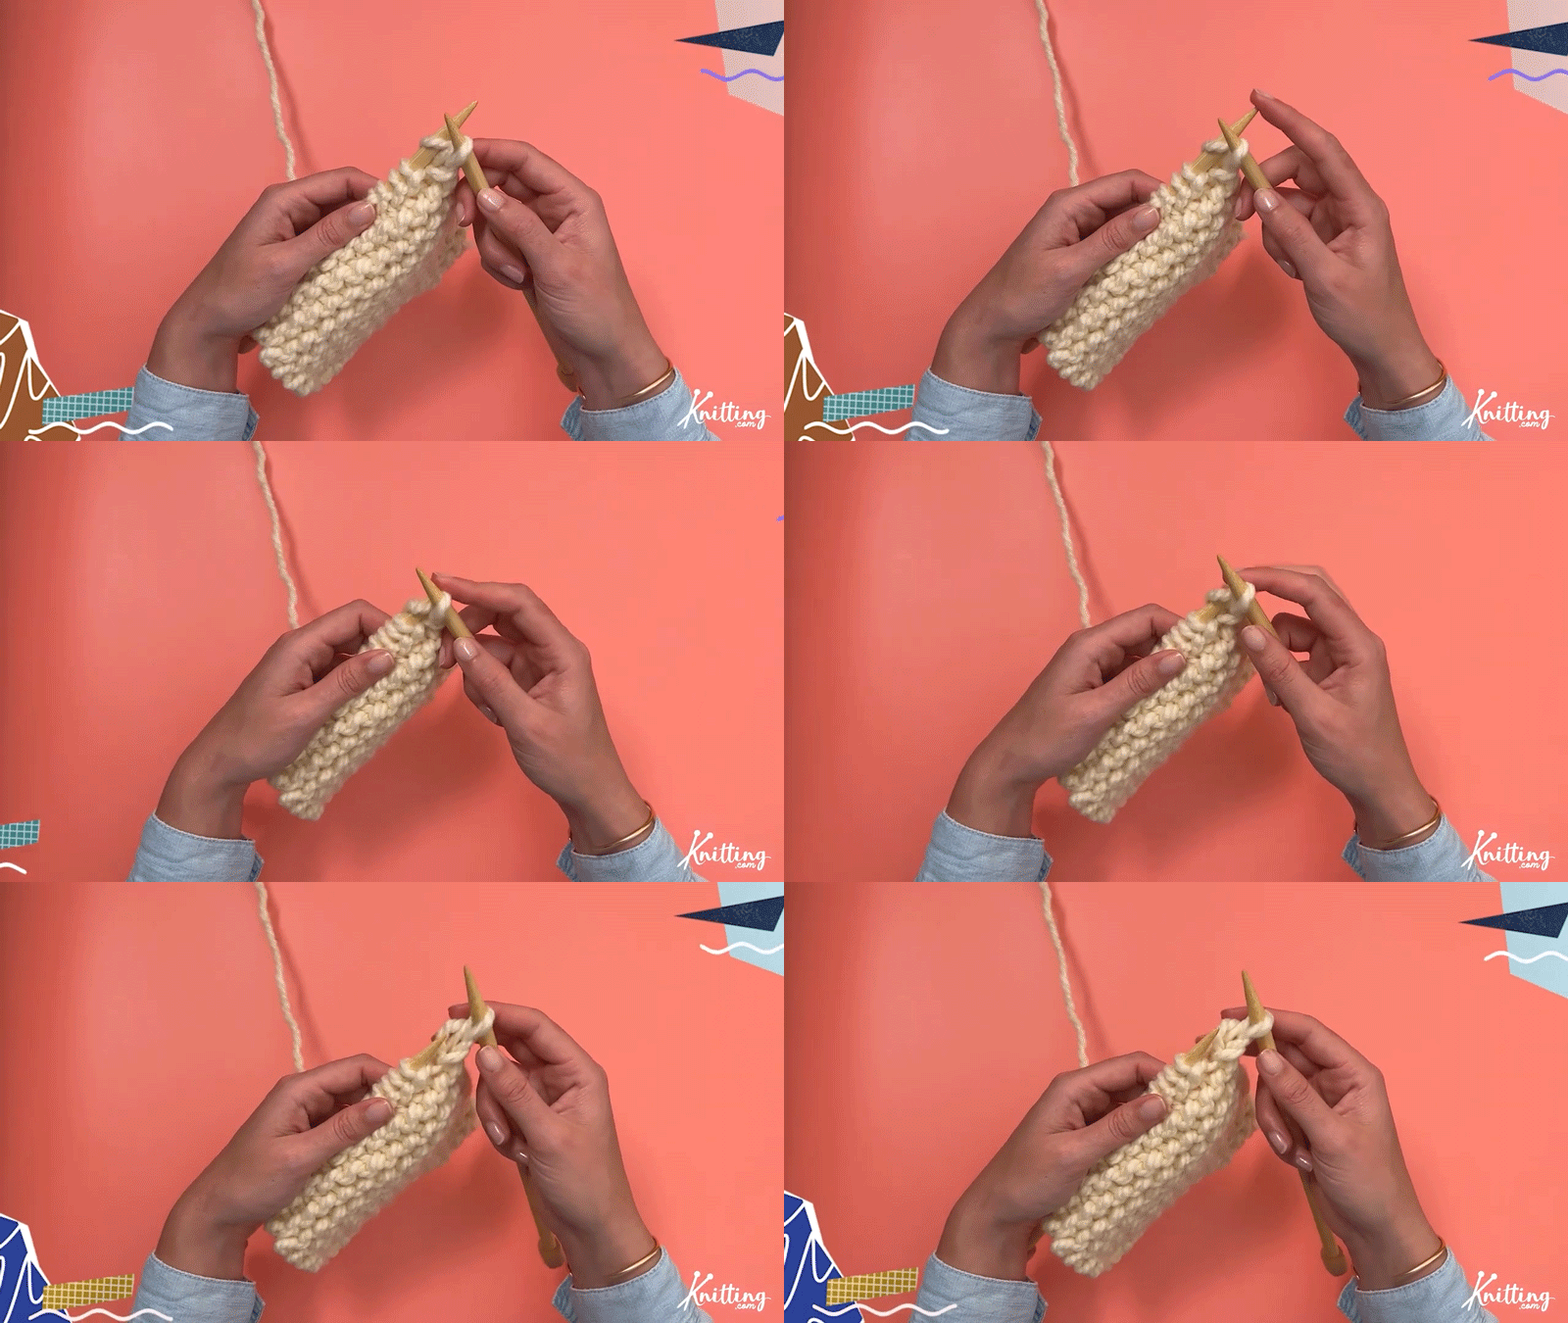
Now you have your first knit stitch on your right needle! What you’ll do next is repeat steps 1 to 4 for all the other loops on your left needle.
Once you’re done knitting a row, simply switch your right needle to your left, and your left needle to your right. It’s time to knit all the rows again!
You will continue to knit all the rows back and forth until your knit fabric is about 8″ tall from your needle to the edge of your knit fabric. When you have 8″, it’s time to bind off.
The knitted rows will form a springy fabric called the garter stitch — which is what this free dishcloth knitting pattern is made out of.
Binding off (casting off) refers to stitches that remove the knitted project off the knitting needle without unraveling it. There are many types of bind off/ cast off techniques, but we’re focusing on The Knitted Bind Off for this tutorial.
The knitted bind off is just like making knit stitches. Here’s how to do it:
Knit the FIRST TWO stitches.

Insert your left needle through the FIRST LOOP on your right needle.
Pull it OVER the second loop of your right needle and drop it down. Now you have your first bind off/cast off stitch!
Knit the next stitch on your left needle.
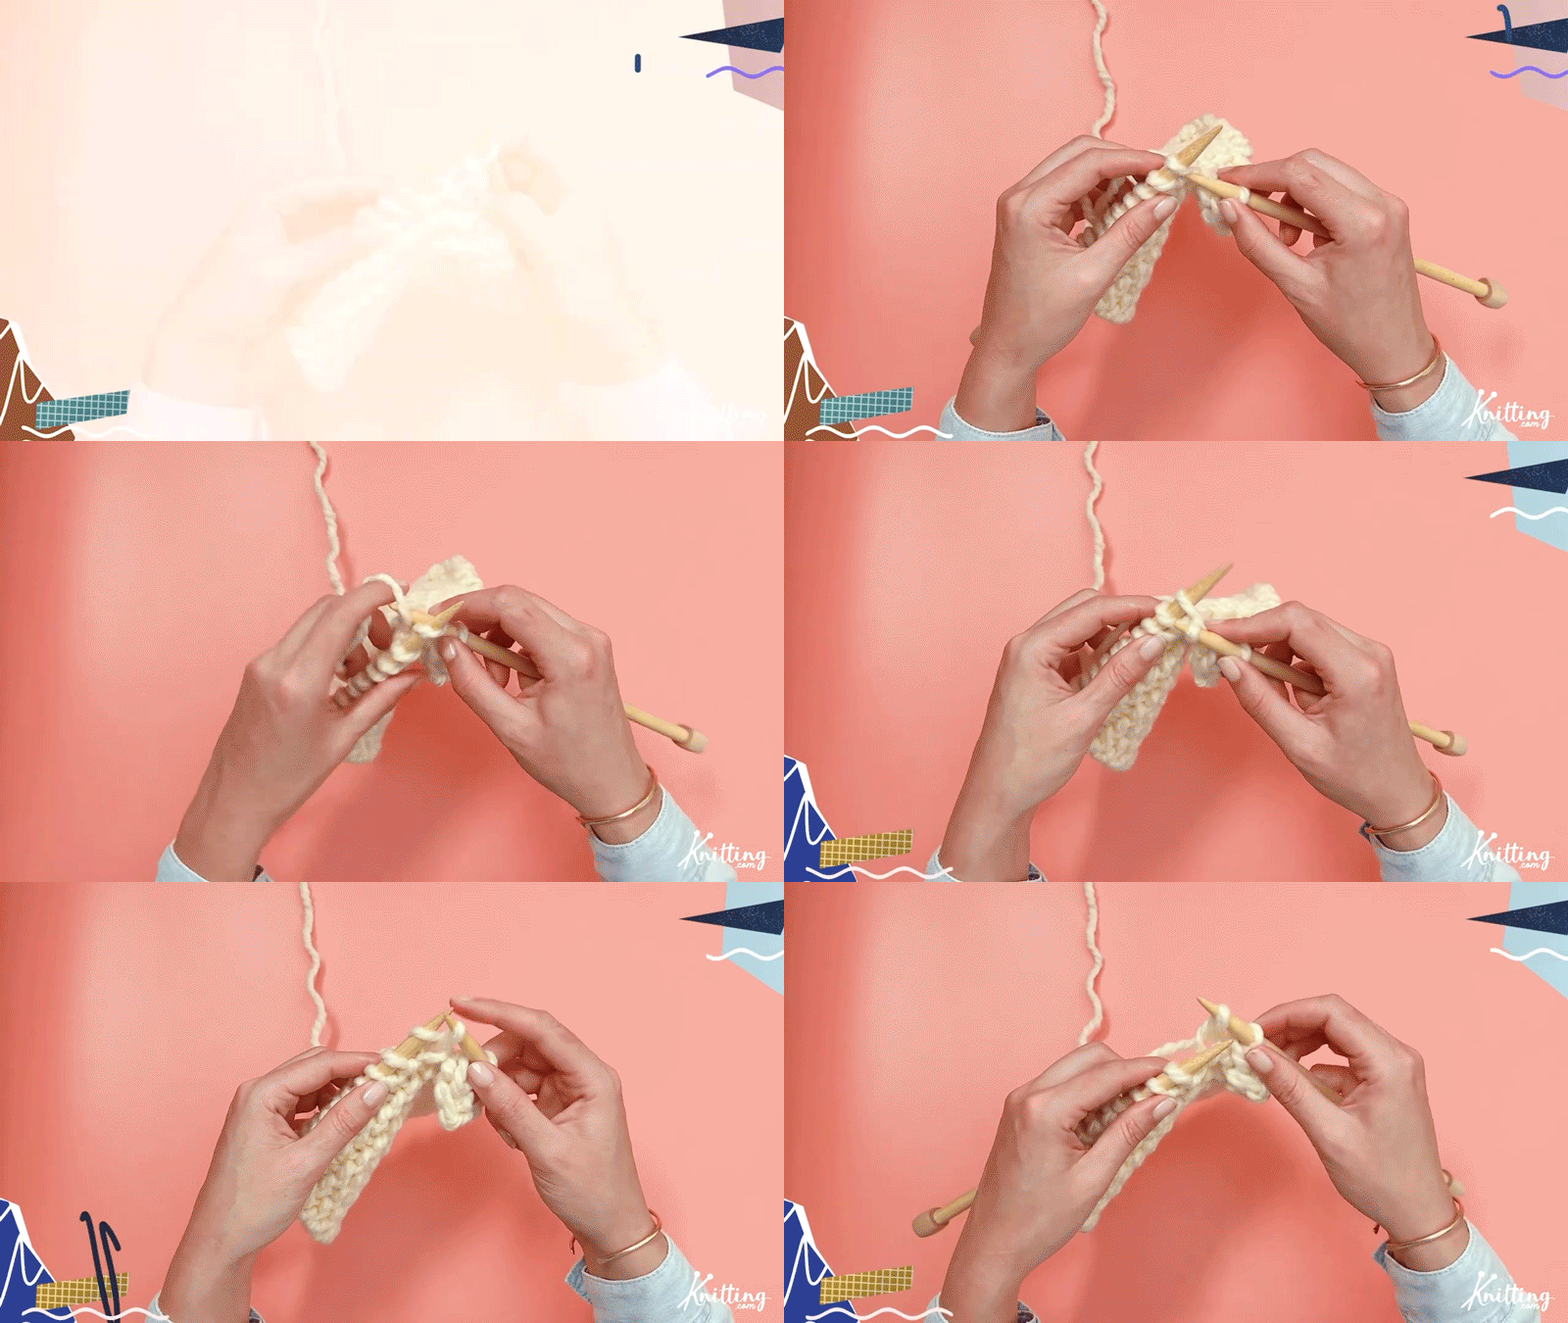
Keep repeating steps 2 and 3 until you have cast off ALL of the stitches on your needle.
Cut the “working yarn” and pull it through the final loop to lock in the stitch.
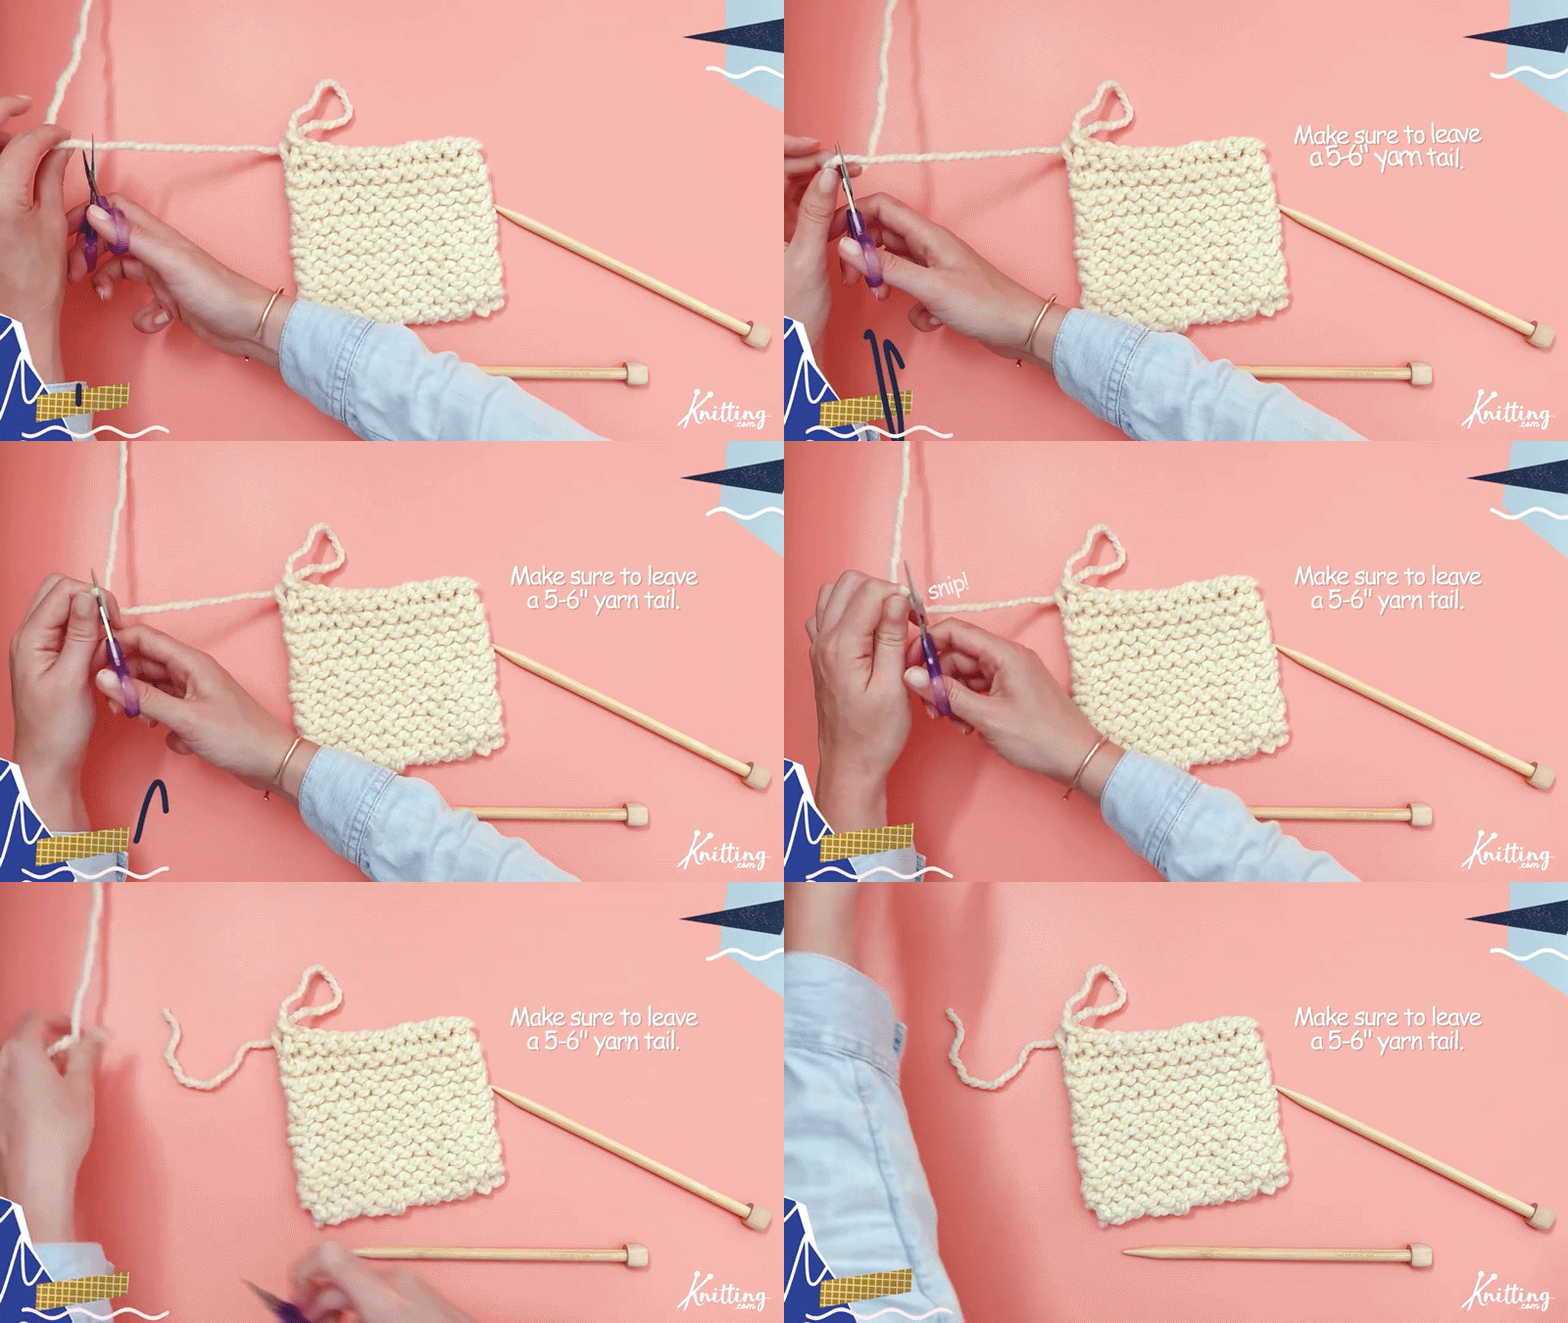
The act of cutting the working yarn is refer to as “finishing off” or F/O in knitting patterns.
Done casting off? It’s time to weave in your yarn ends!
The great thing about the garter stitch is how easy it is to hide yarn tails in. Once you’ve hidden the tails inside the your garter stitch fabric, it’s almost impossible to see it.
Here’s how to weave in your yarn ends:
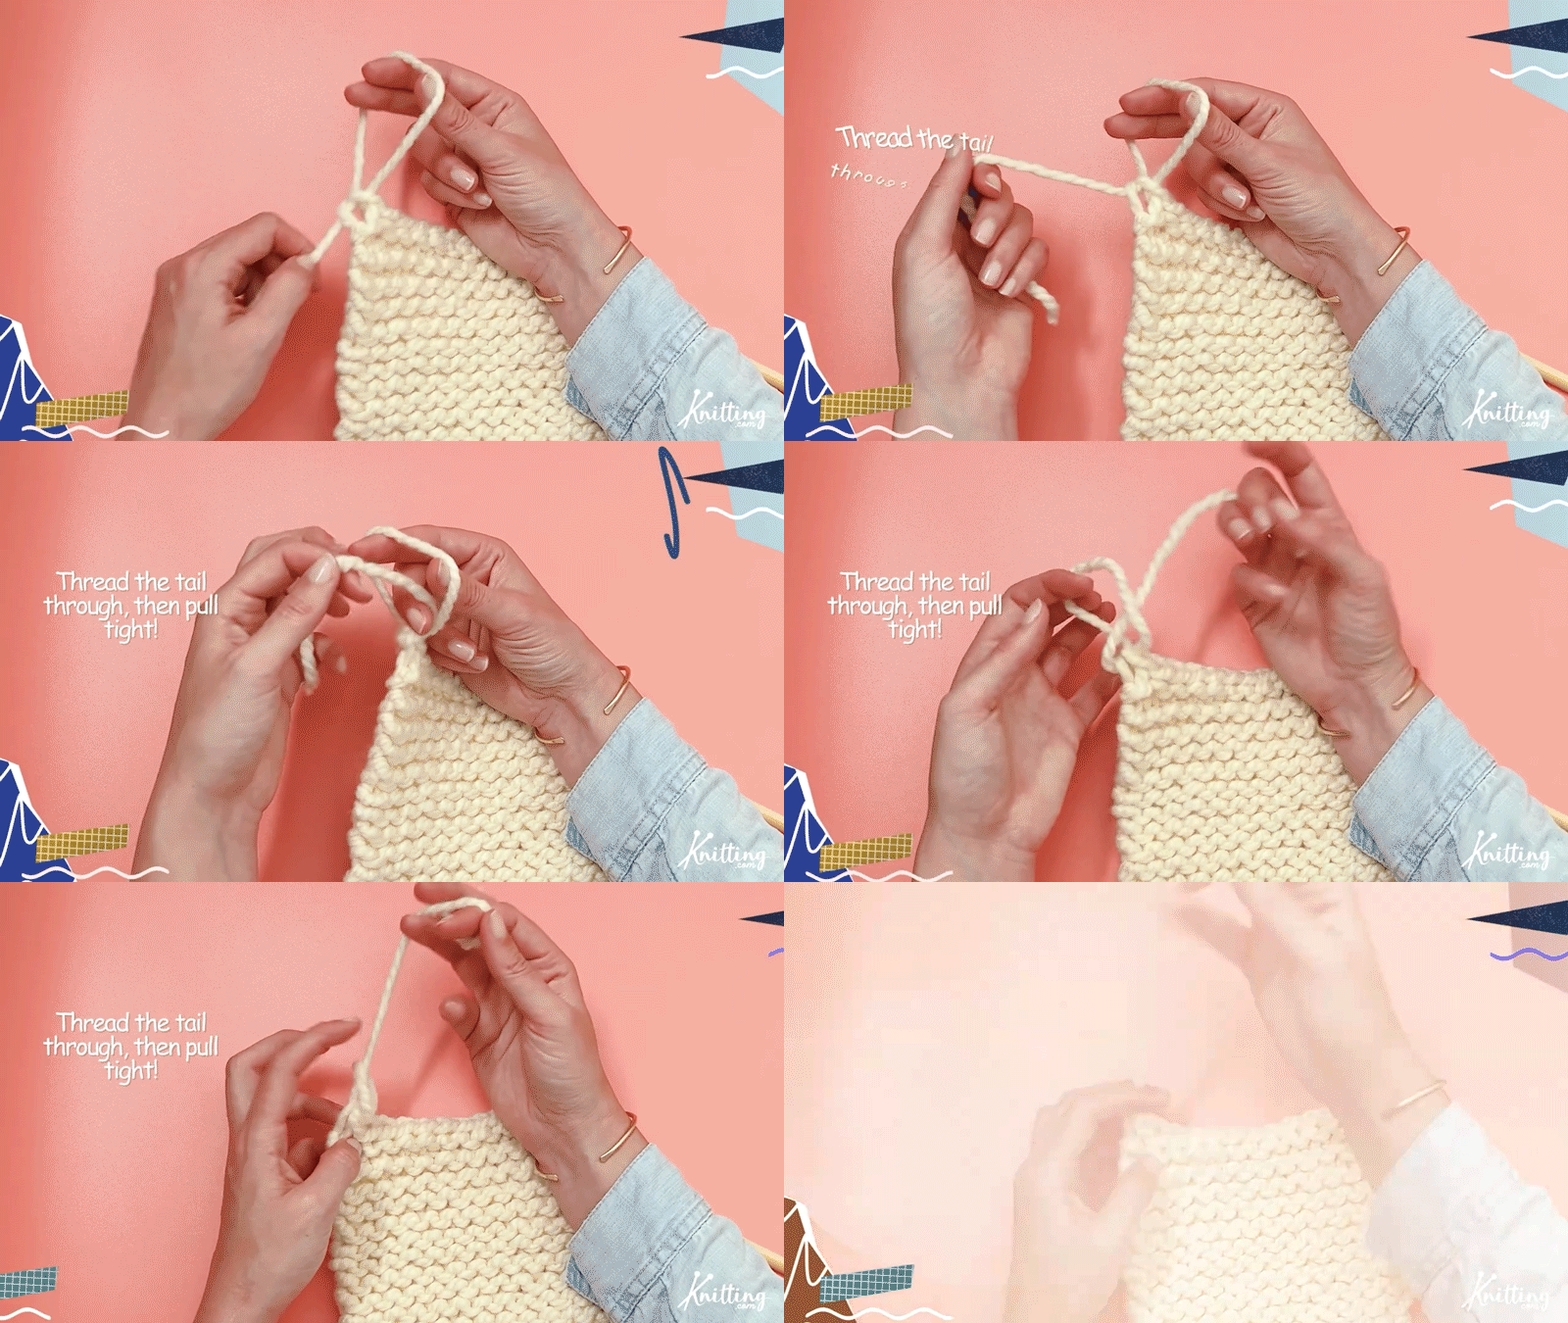
Thread one yarn end through your yarn needle and find the closest stitch to the edge you’re working on.
(We’re working in the middle of the knit fabric with a contrasting yarn color for this tutorial)
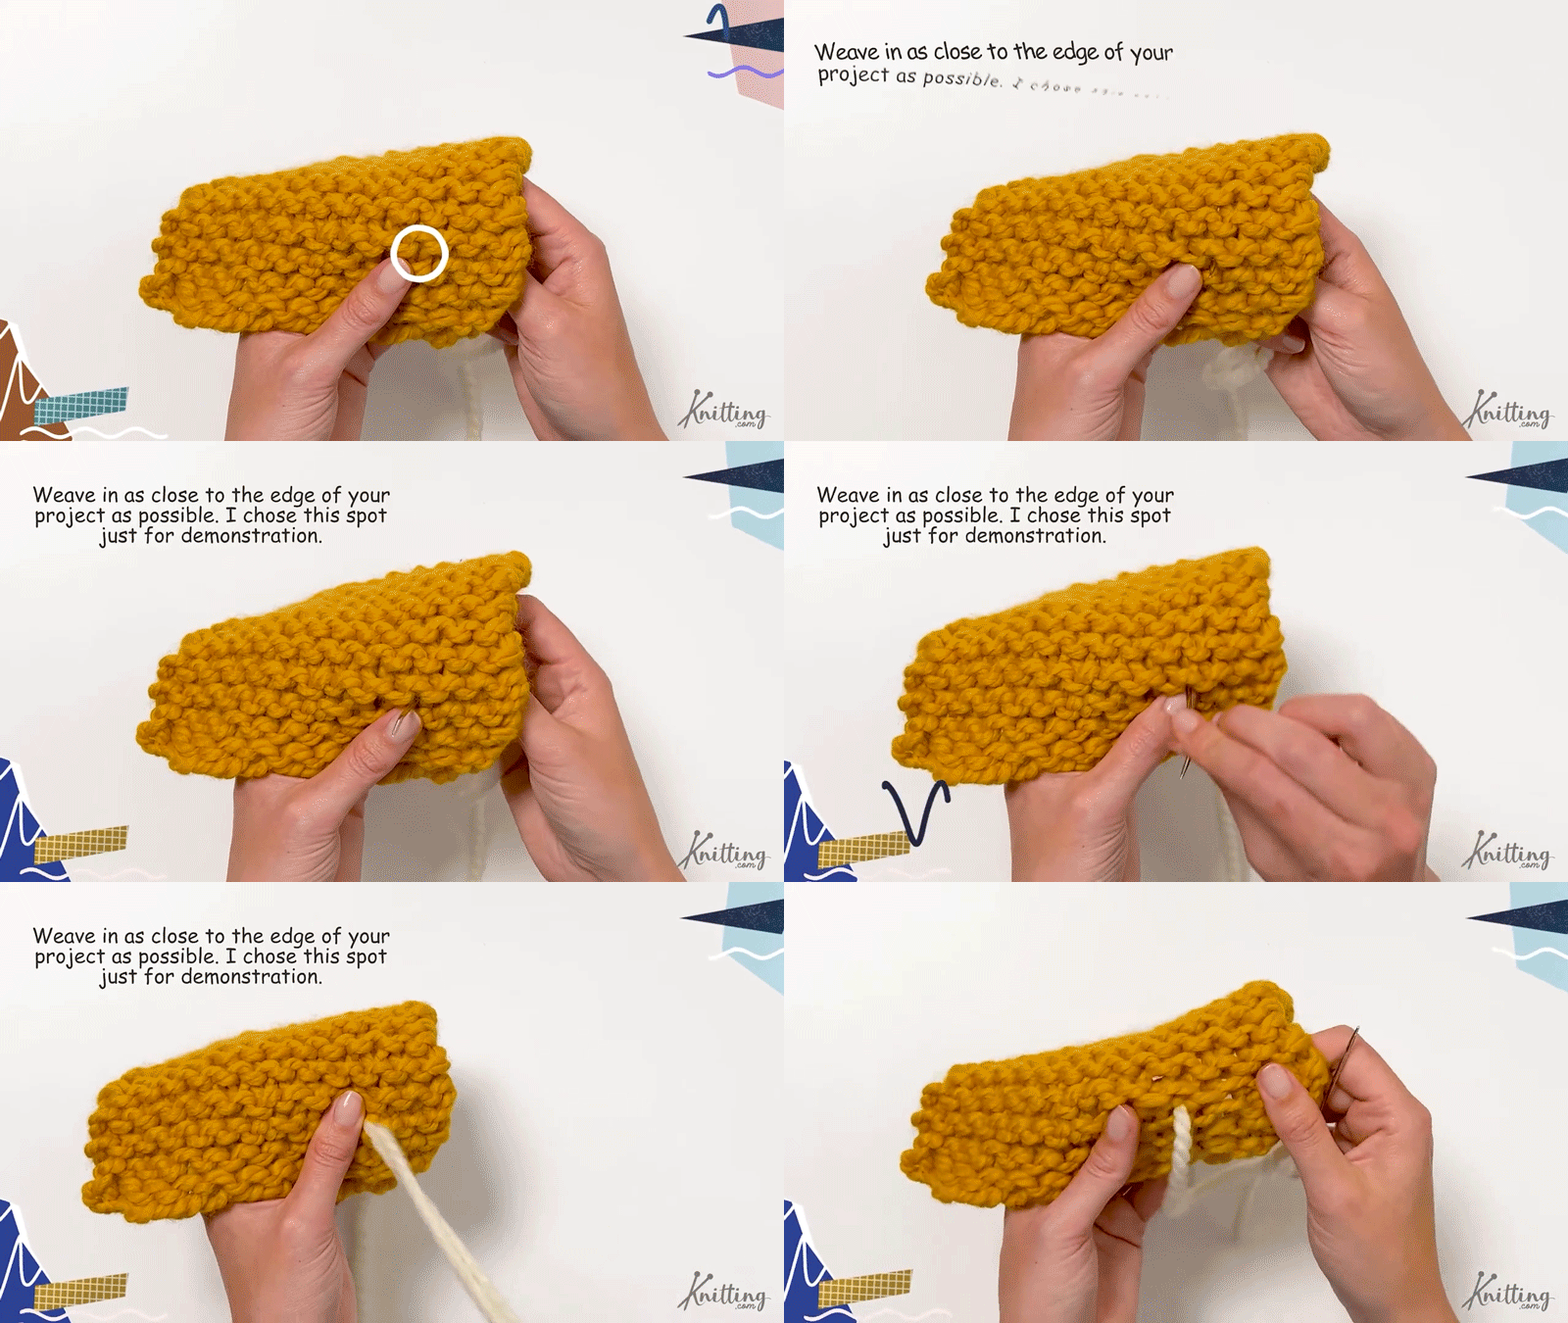
Go under the first “U” shape and pull your needle through, upwards.
Go into the bump right next to your first “U” and insert your needle from the top, towards the bottom.
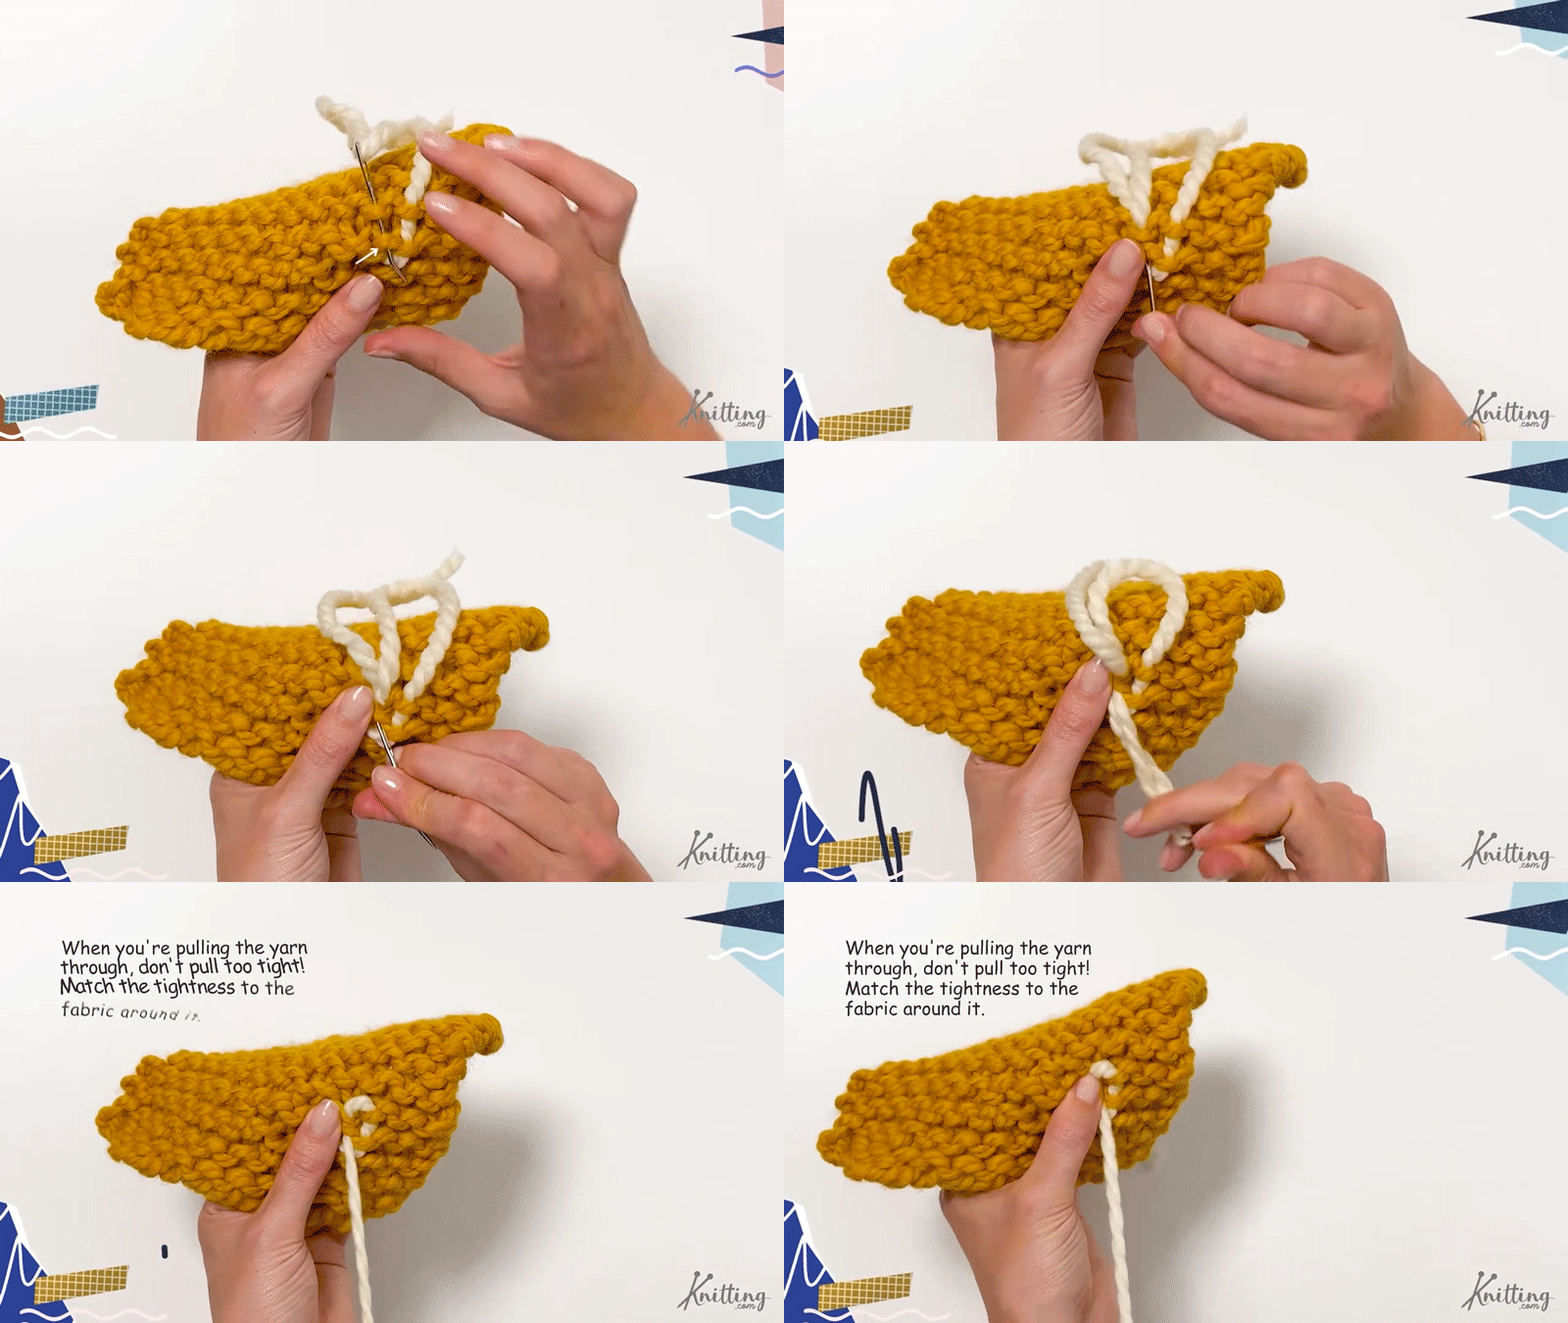
Go under the “U” right next to it and insert your needle upwards. Pull it through.
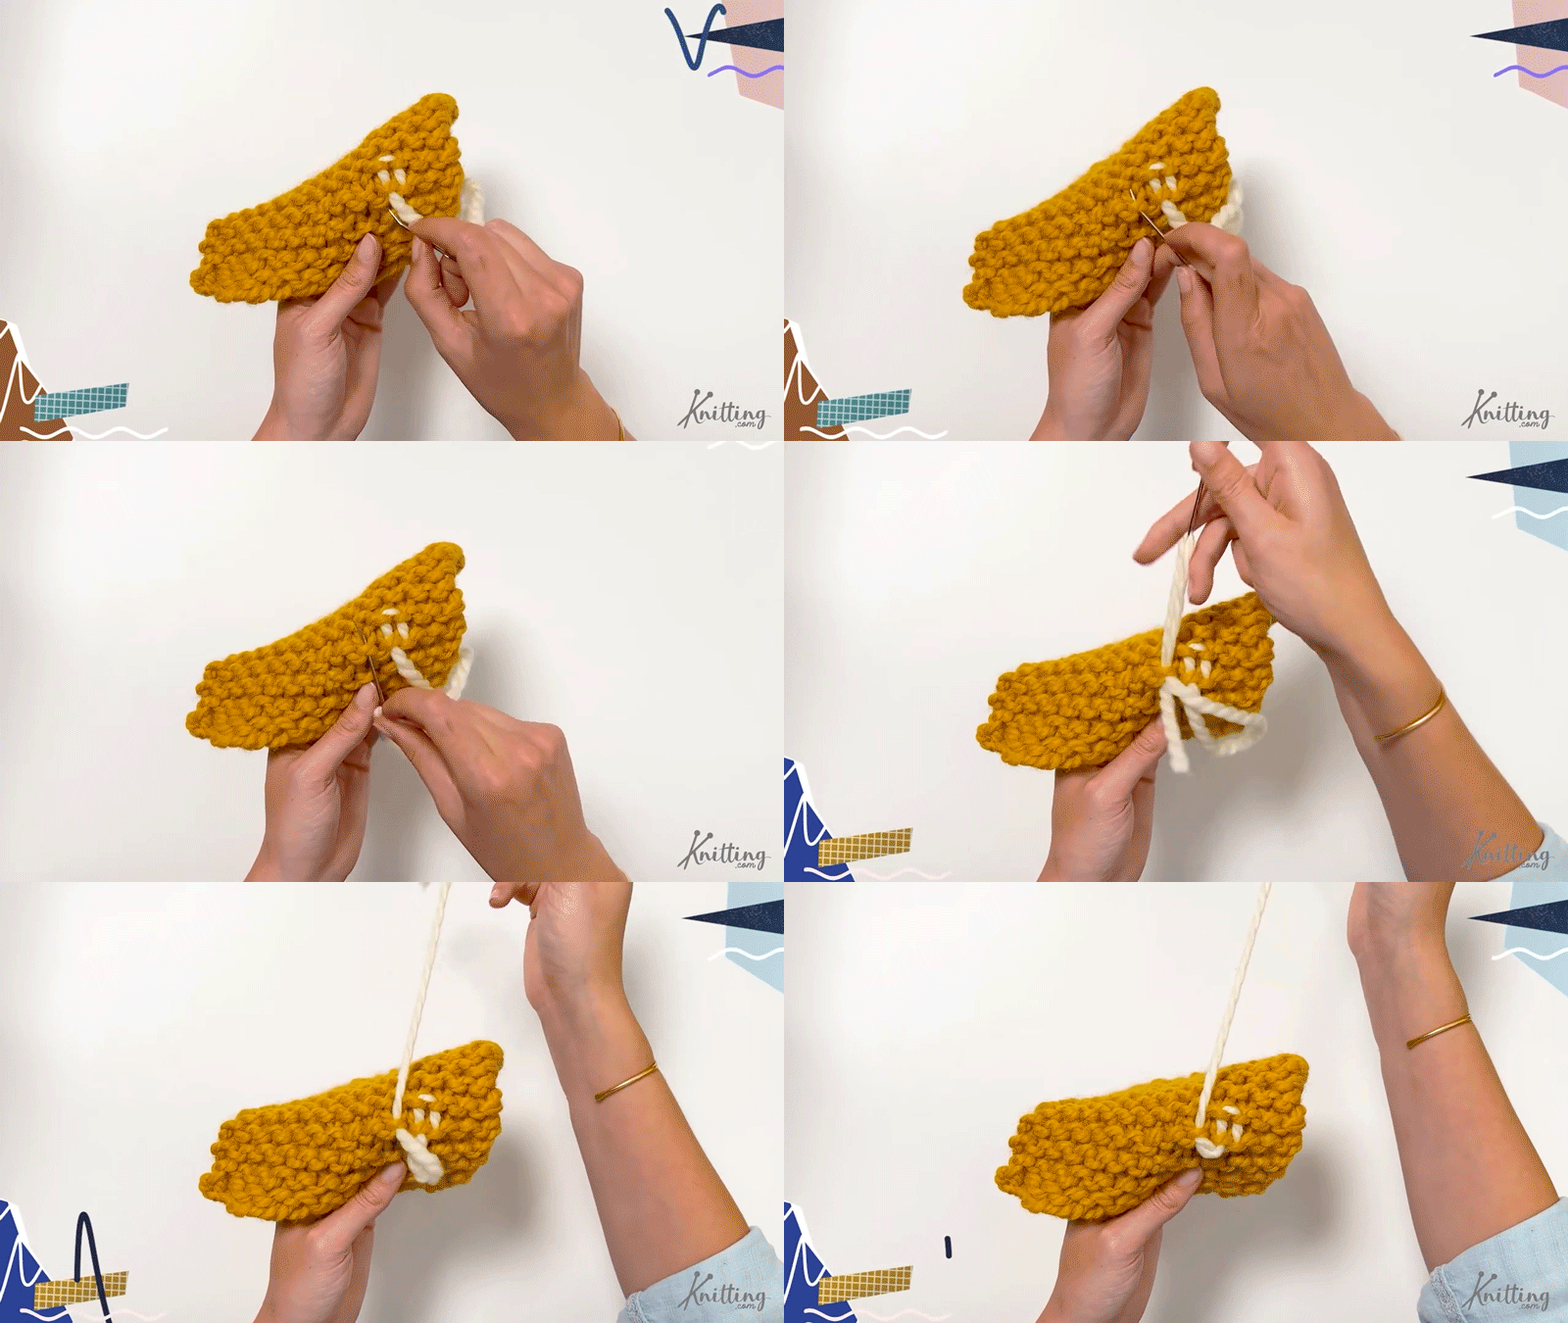
Turn your needle downward, and go right through the bump right next to it. Don’t pull your thread too tight so you don’t scrunch up the stitches.
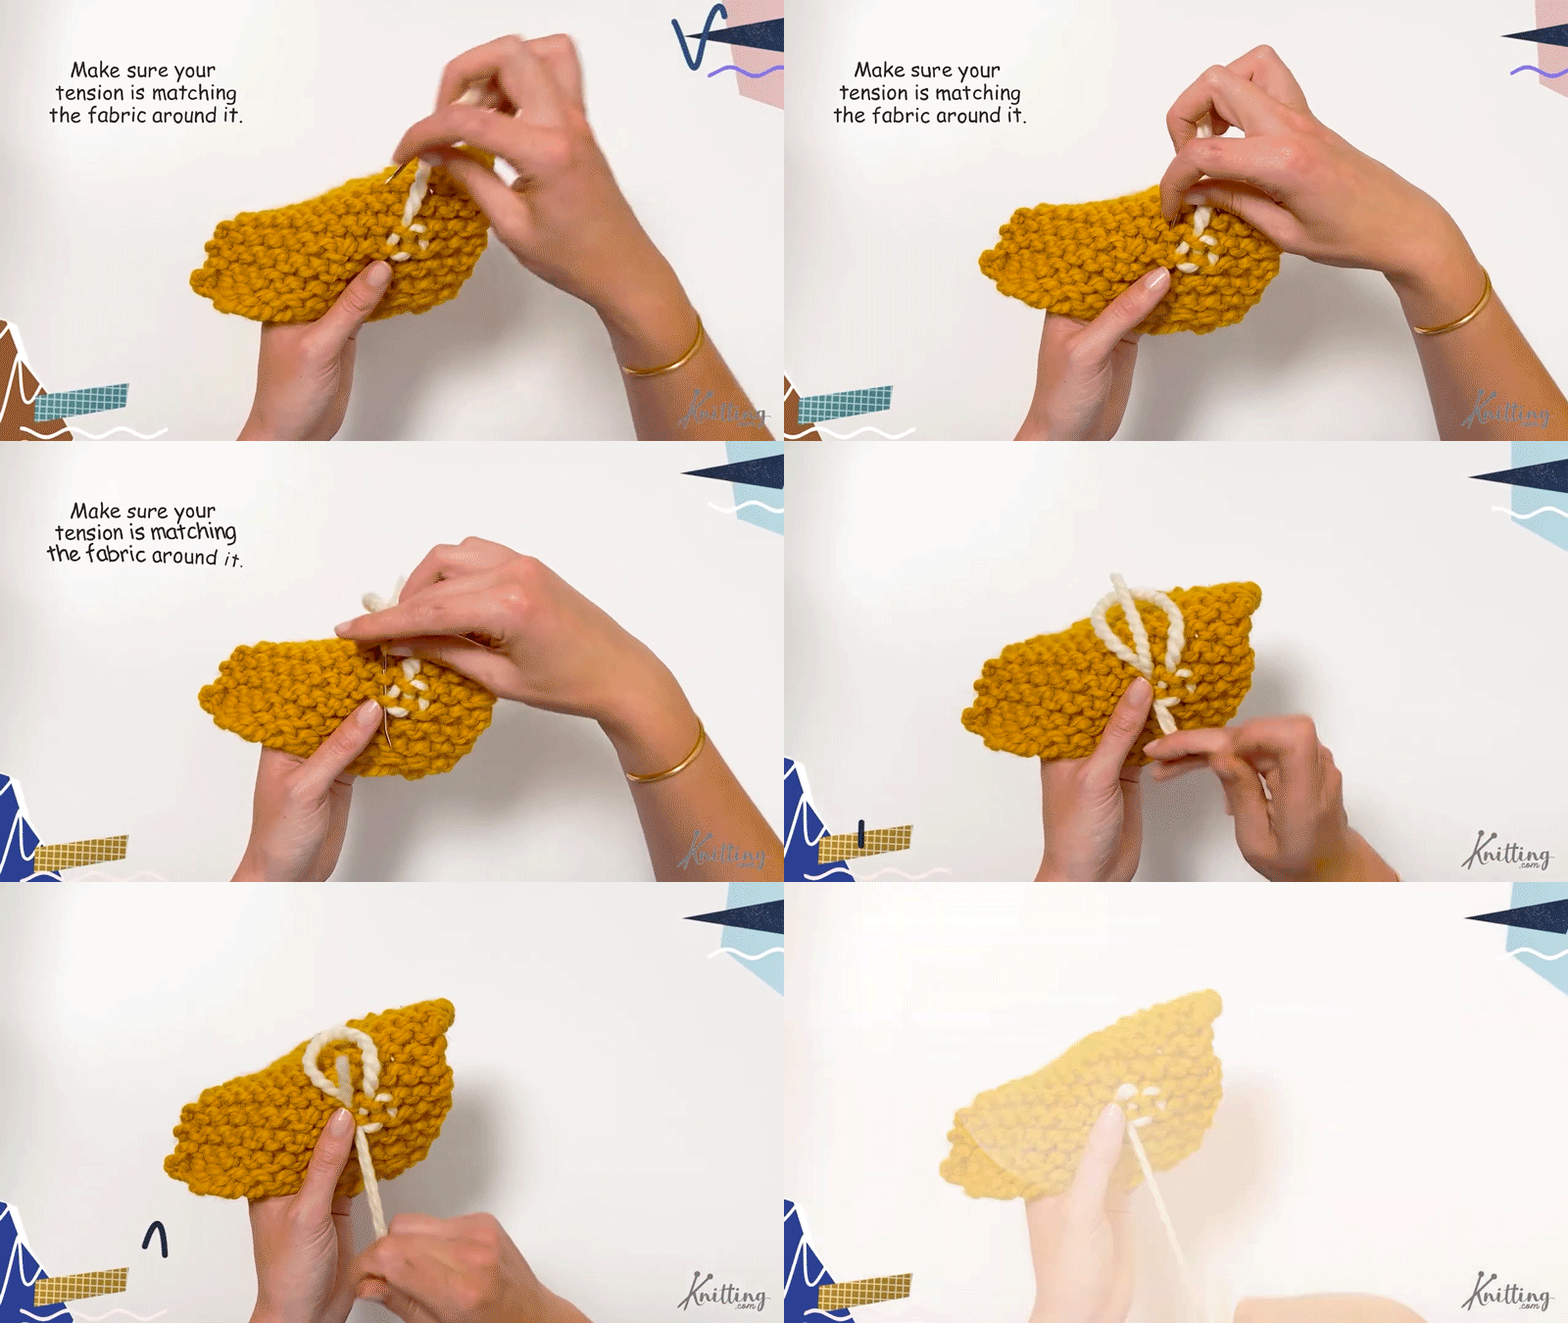
Repeat steps 3 and 4 for at least 5 stitches or until your yarn end (or yarn tail) is completely woven in. Cut your yarn.
Simply repeat steps 3 and 4 if you still have loose yarn ends to hide!
Did your free dishcloth knitting pattern turn out smaller or bigger than 8″? Either way, that’s completely fine! This just means that you have a different gauge and tension.
The stitch tension refers to how tight you knit. The tighter you knit, the smaller your stitches, and the smaller your dishcloth. If you have a loose tension, then your stitches are larger, and your garter stitch dishcloth will be larger too.
How loose or tight your tension is will affect your knitting gauge.
The knitting gauge refers to how many stitches and rows you have inside one inch on your finished knitted fabric.
When you have a loose stitch tension, you have a loose gauge. This means you have fewer stitches and rows inside a single inch.
If you have at tight stitch tension, you have a tight gauge. This means you have more stitches and rows inside a single inch.
– If you knit at a looser gauge (fewer stitches per inch) then you will have a looser, more airy fabric and a wider dishcloth.
Solution: Get a tighter gauge by using knitting needles that are one size smaller than your current needles.
For example, if you’re using a US 7 knitting needle and your gauge is too loose, us a US 6 instead!
– If you knit with a tighter gauge (more stitches per inch) then you will have a tighter fabric and narrower dishcloth.
Solution: Get a looser gauge by using knitting needles that are one size larger than the needles you’re using.
For example, if you’re using size US 7 knitting needles and your gauge is too tight, use a US 8 instead!
Want to learn more? We have a whole tutorial and video covering everything you need to know about knitting gauge.
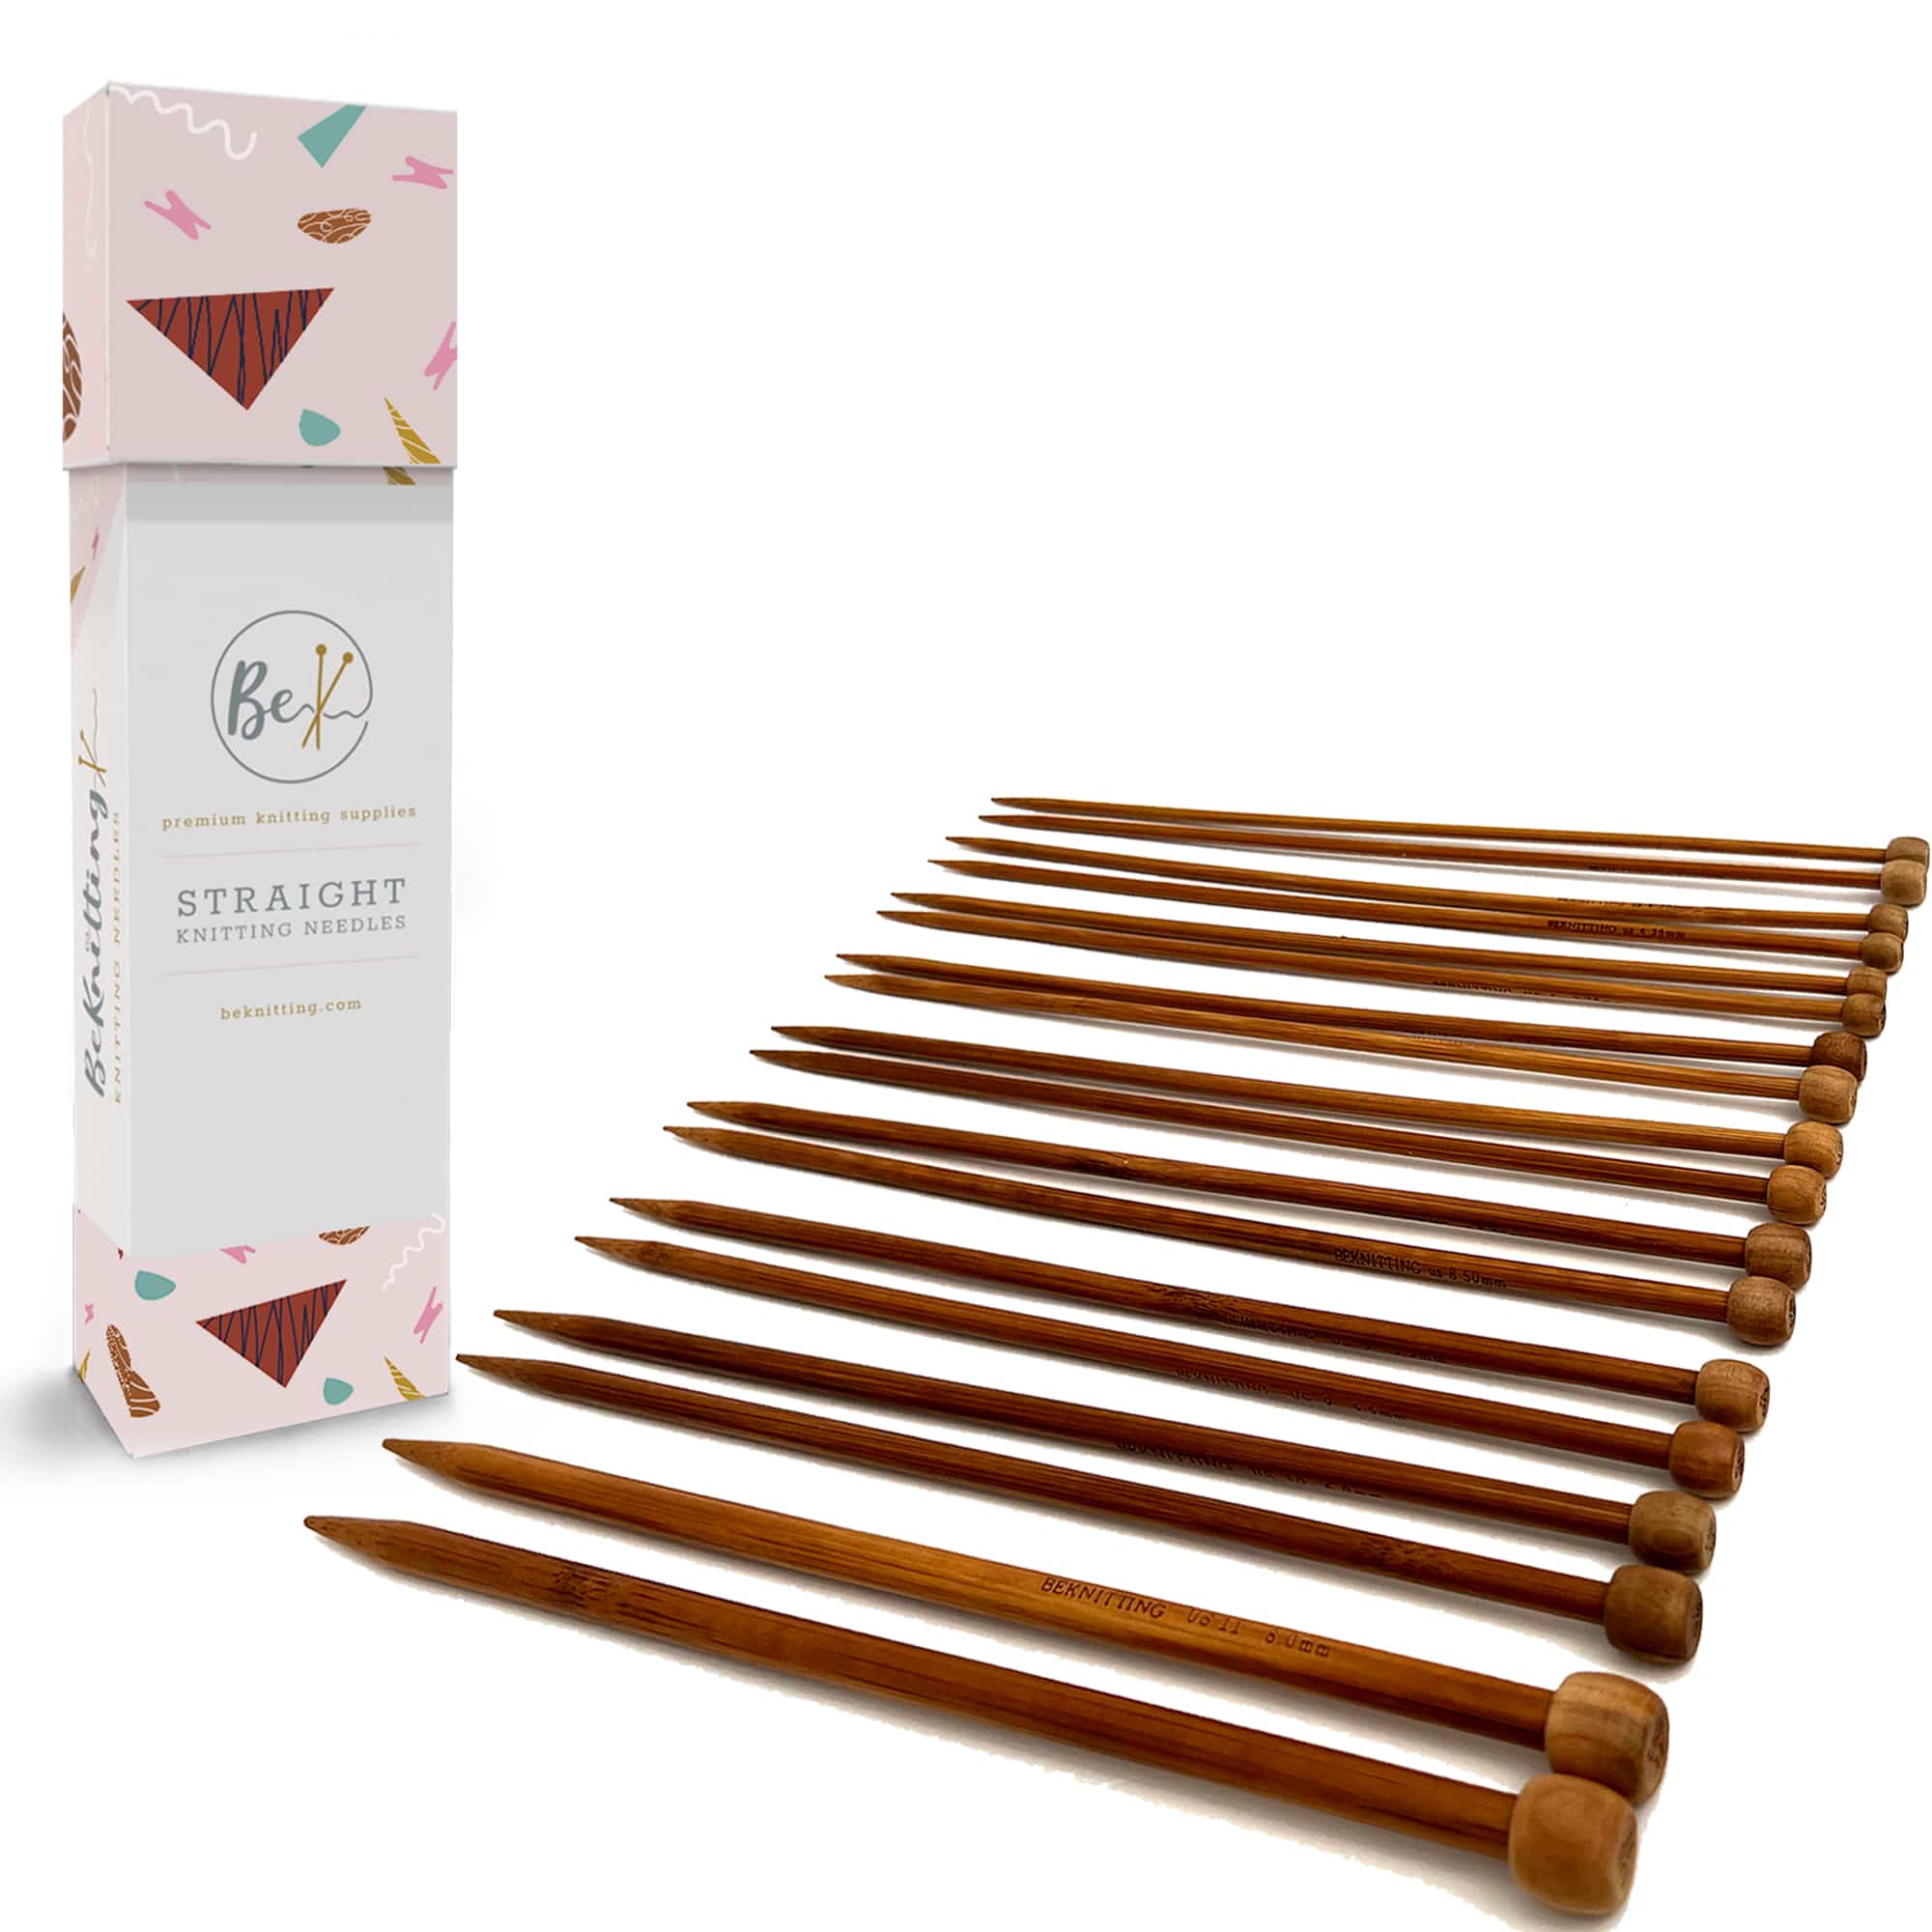
Don’t you just hate when yarn slips off your knitting needles?
Introducing BeKnitting’s Set of 9 Straight Bamboo Knitting Needles! Sleek, sturdy, and slip-proof, these needles will give you the smoothest knitting experience ever.
Find them on Amazon!
Knitting is all about learning new things! Here’s a list of helpful techniques and skills that will make knitting your free dishcloth knitting pattern that much easier.
Magic Knot for Joining Yarn: This knot makes it easy to join a new ball of yarn when you run out!
Threading a Yarn Needle: While we’re at it, sometimes threading a yarn needle with yarn can be tricky! This tutorial shows you how to thread a needle with any yarn.
Blocking Knitting: Even though these are easy knit dishcloth patterns, it’s worth taking the time to block your knitting. This simple step creates even stitches, and perfectly straight edges, and makes any project look polished and professional.
Check out our pattern collections featuring free dishcloth knitting patterns by our in-house and other independent designers! Explore tons of textures, shapes, and stitch patterns with 20+ patterns to download and start knitting right away.
